On July 31st, 1917, the Allies made a Western Front push to seize the city of Ypres in West Flanders. The first part of the offensive was the Battle of Pilckem Ridge.
British Empire Douglas Haig 13 Divisions
Germany Erich Ludendorff 7 Divisions
Wargame I would use a skirmish game, Through the Mud and the Blood, for a skirmish-level battle. For a large-scale Great War Spearhead
Models needed – this depends on your collection, but ensure you have approximately twice as many British attackers as German defenders.
Terrain- Standard WWI Terrain with trenches, gun emplacements, no man’s land, barbed wire, muddy ground, building ruins, and rubble.
Table- 6×4 or 8×4
Scenario
The Germans have a small hill filled with defensive emplacements as a defensive line. The defenses have several layers. Place your British force on one table edge and the German trenches about the middle of the table. The German Trenches should have layers.
The British must seize the German defenses. The Germans should counterattack at any and all oppurtunity.
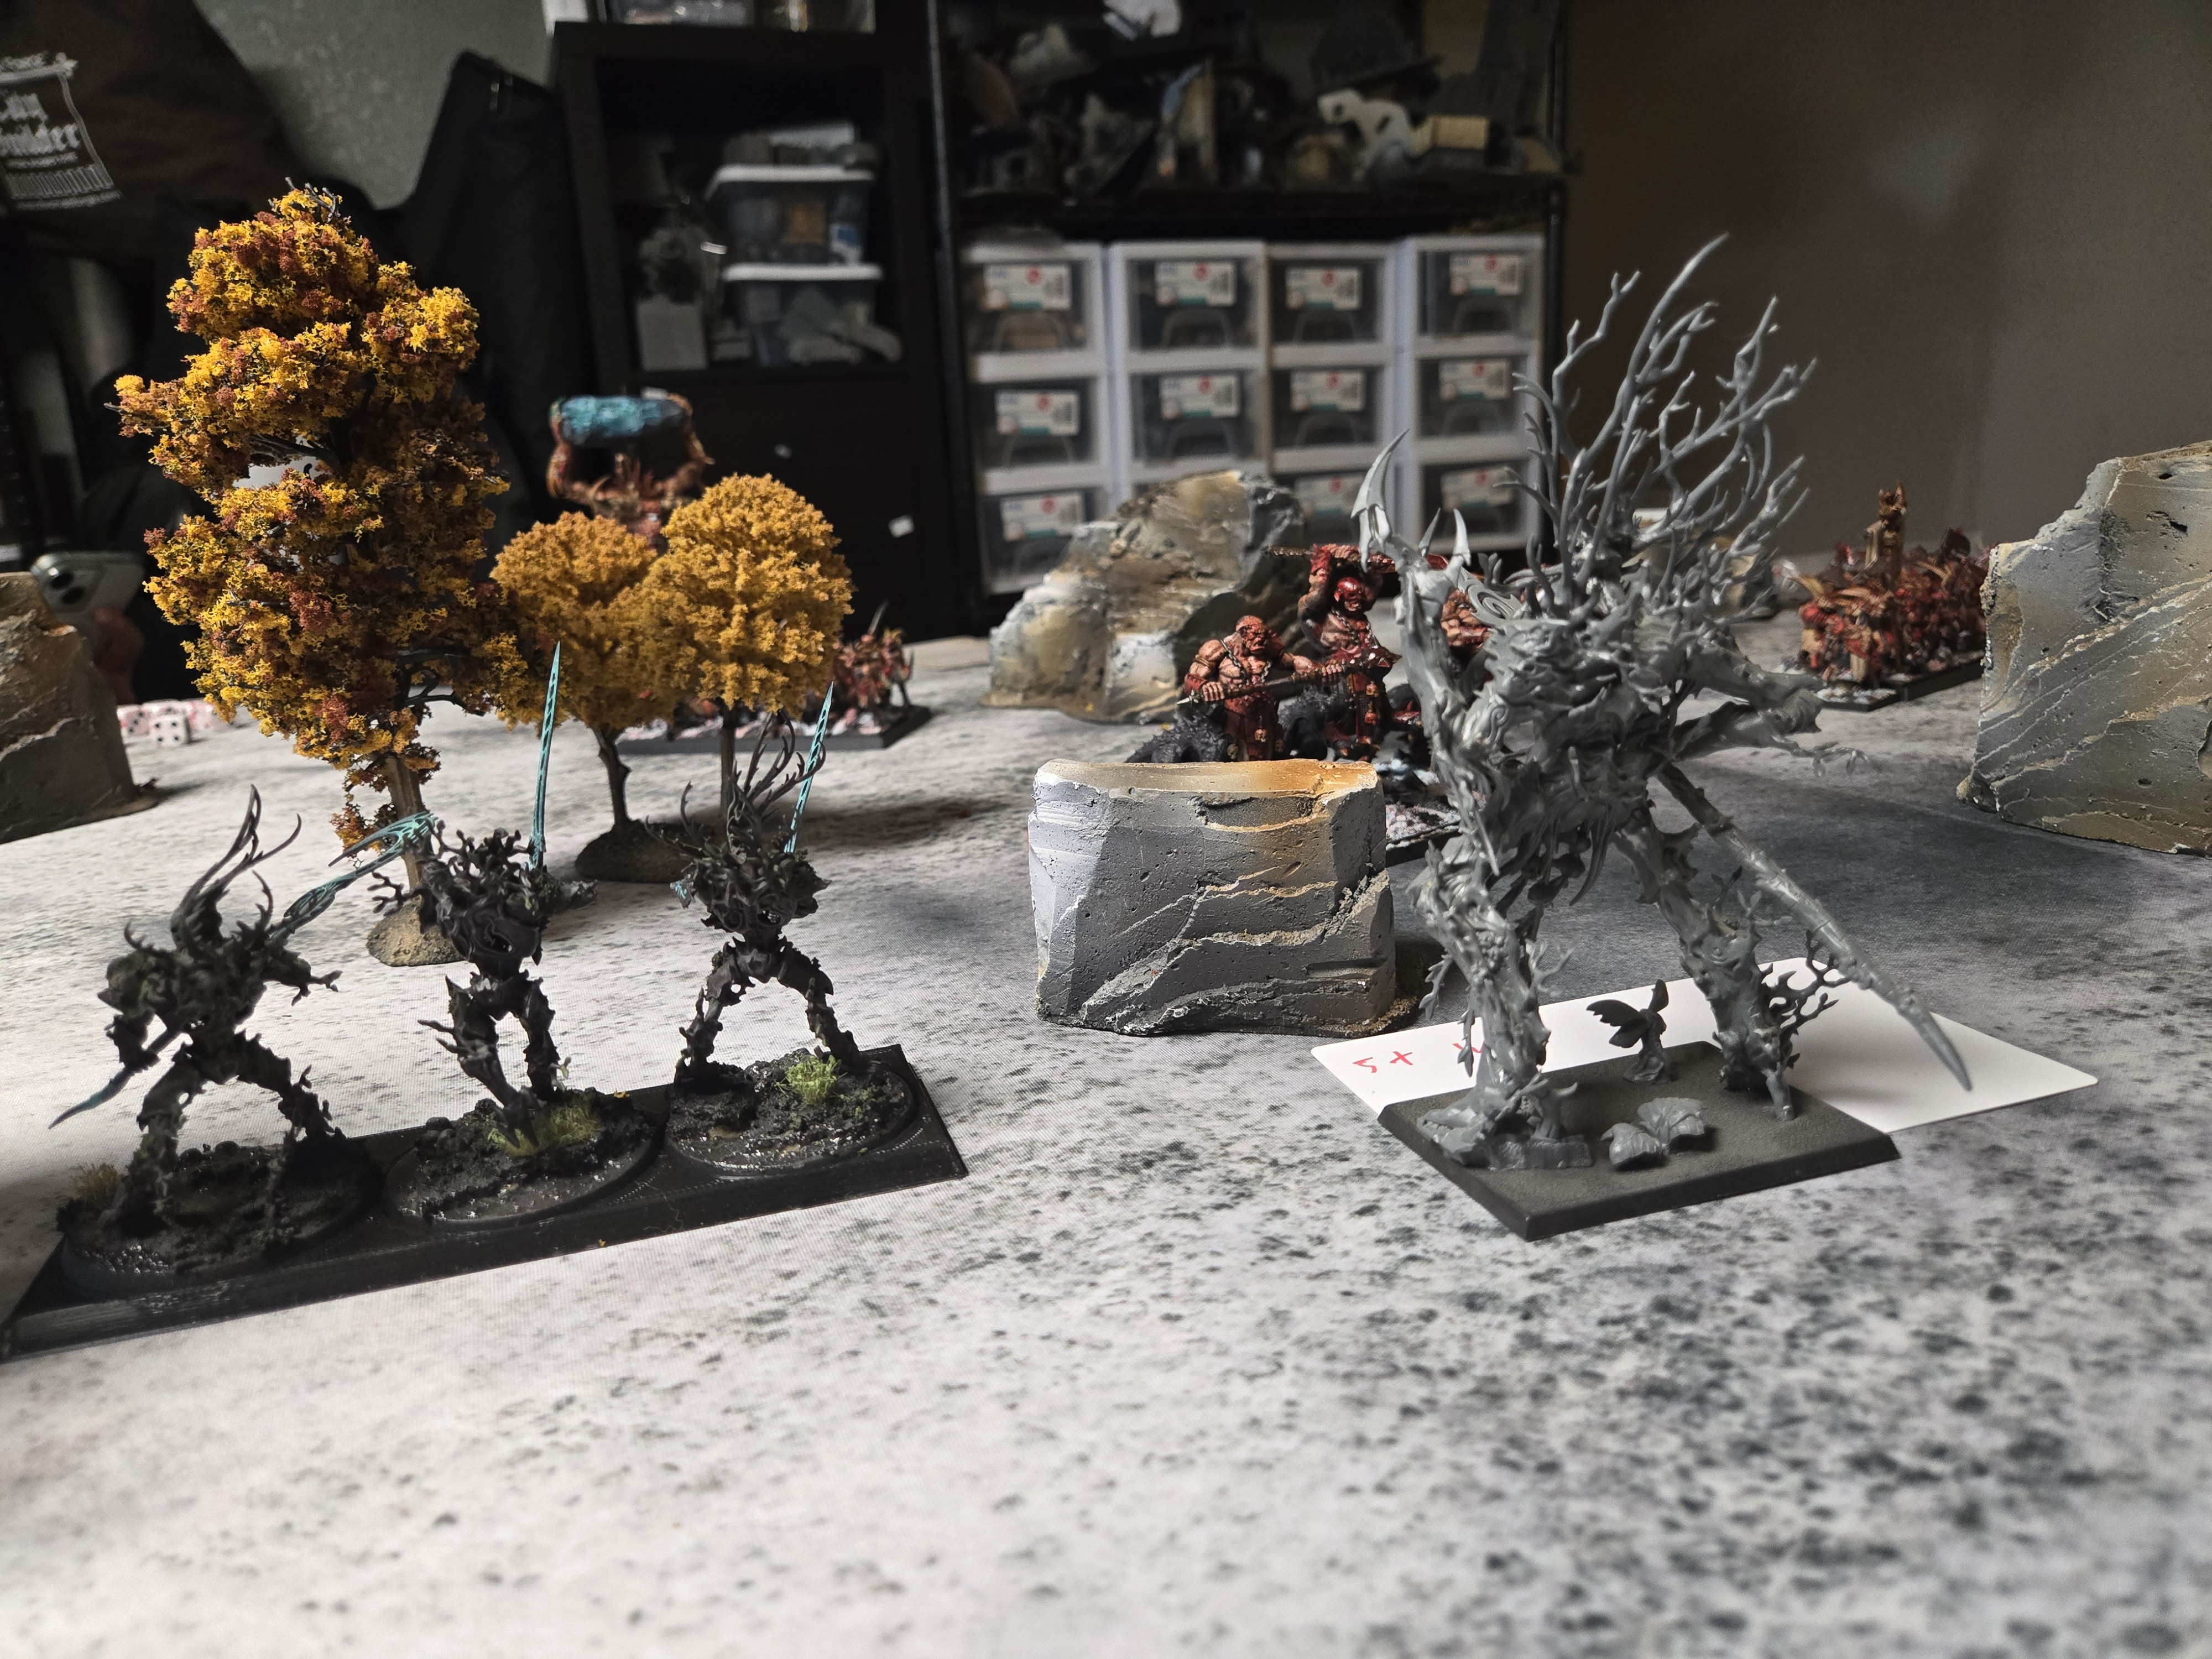
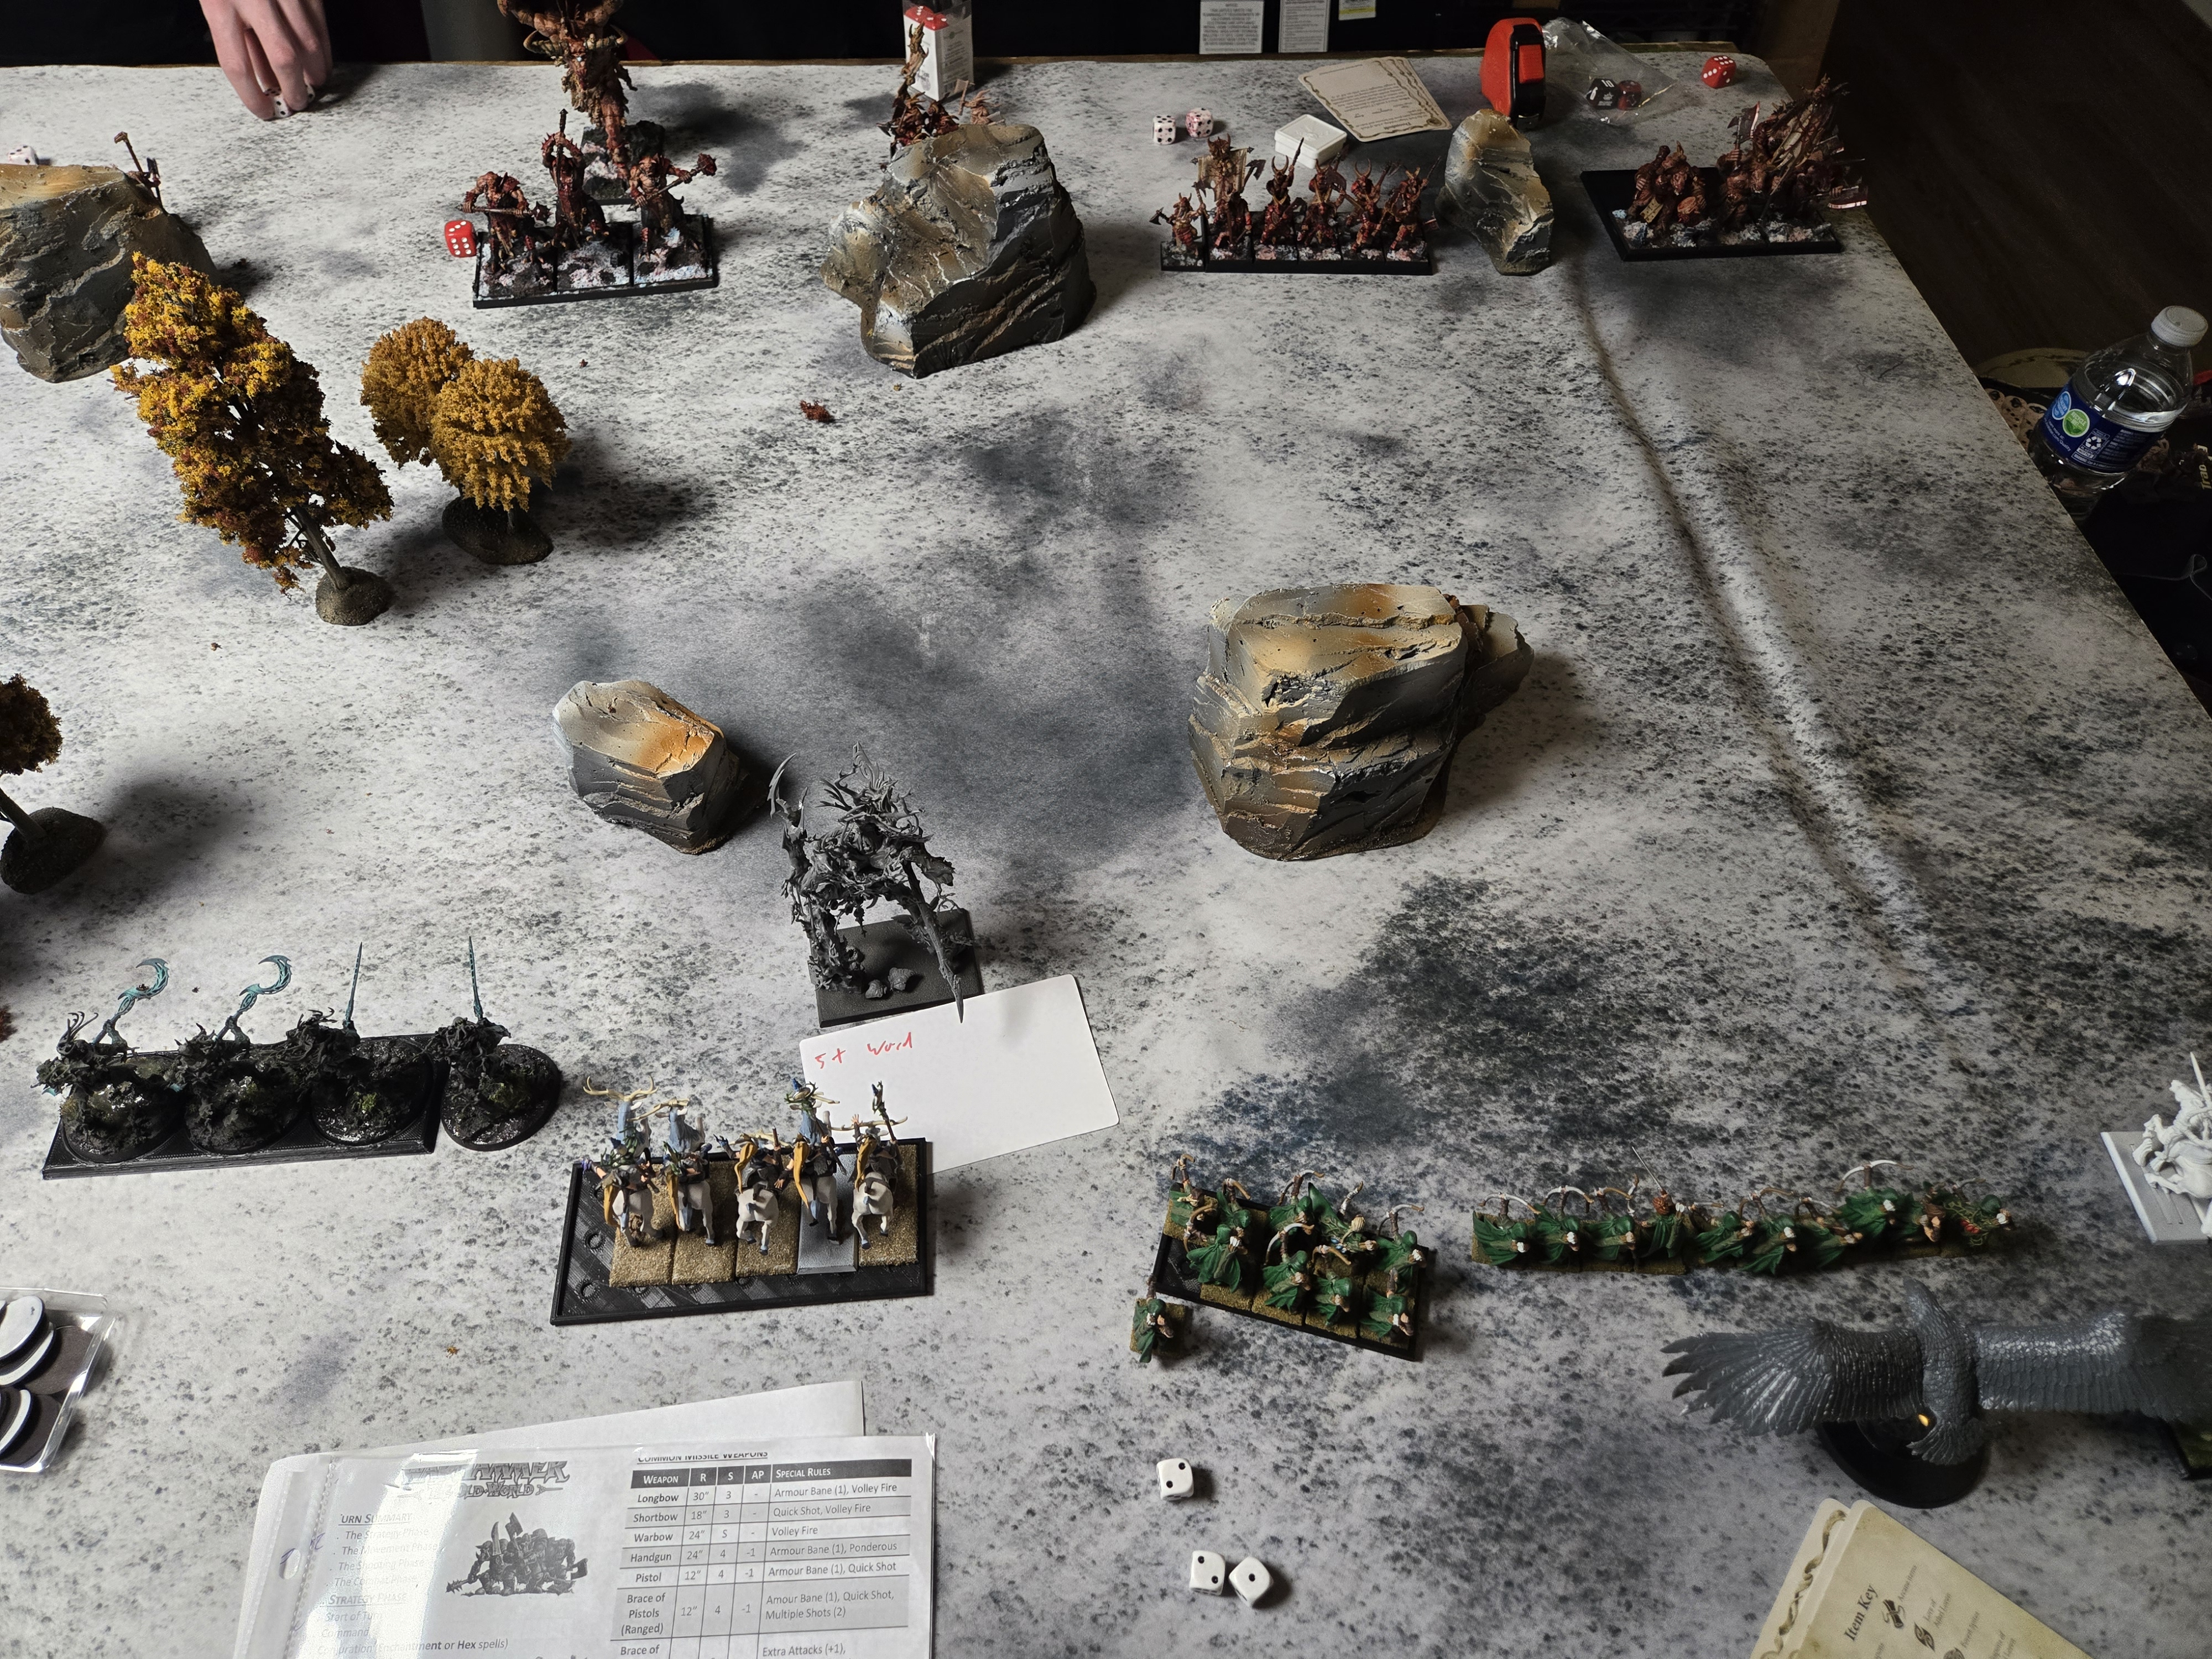
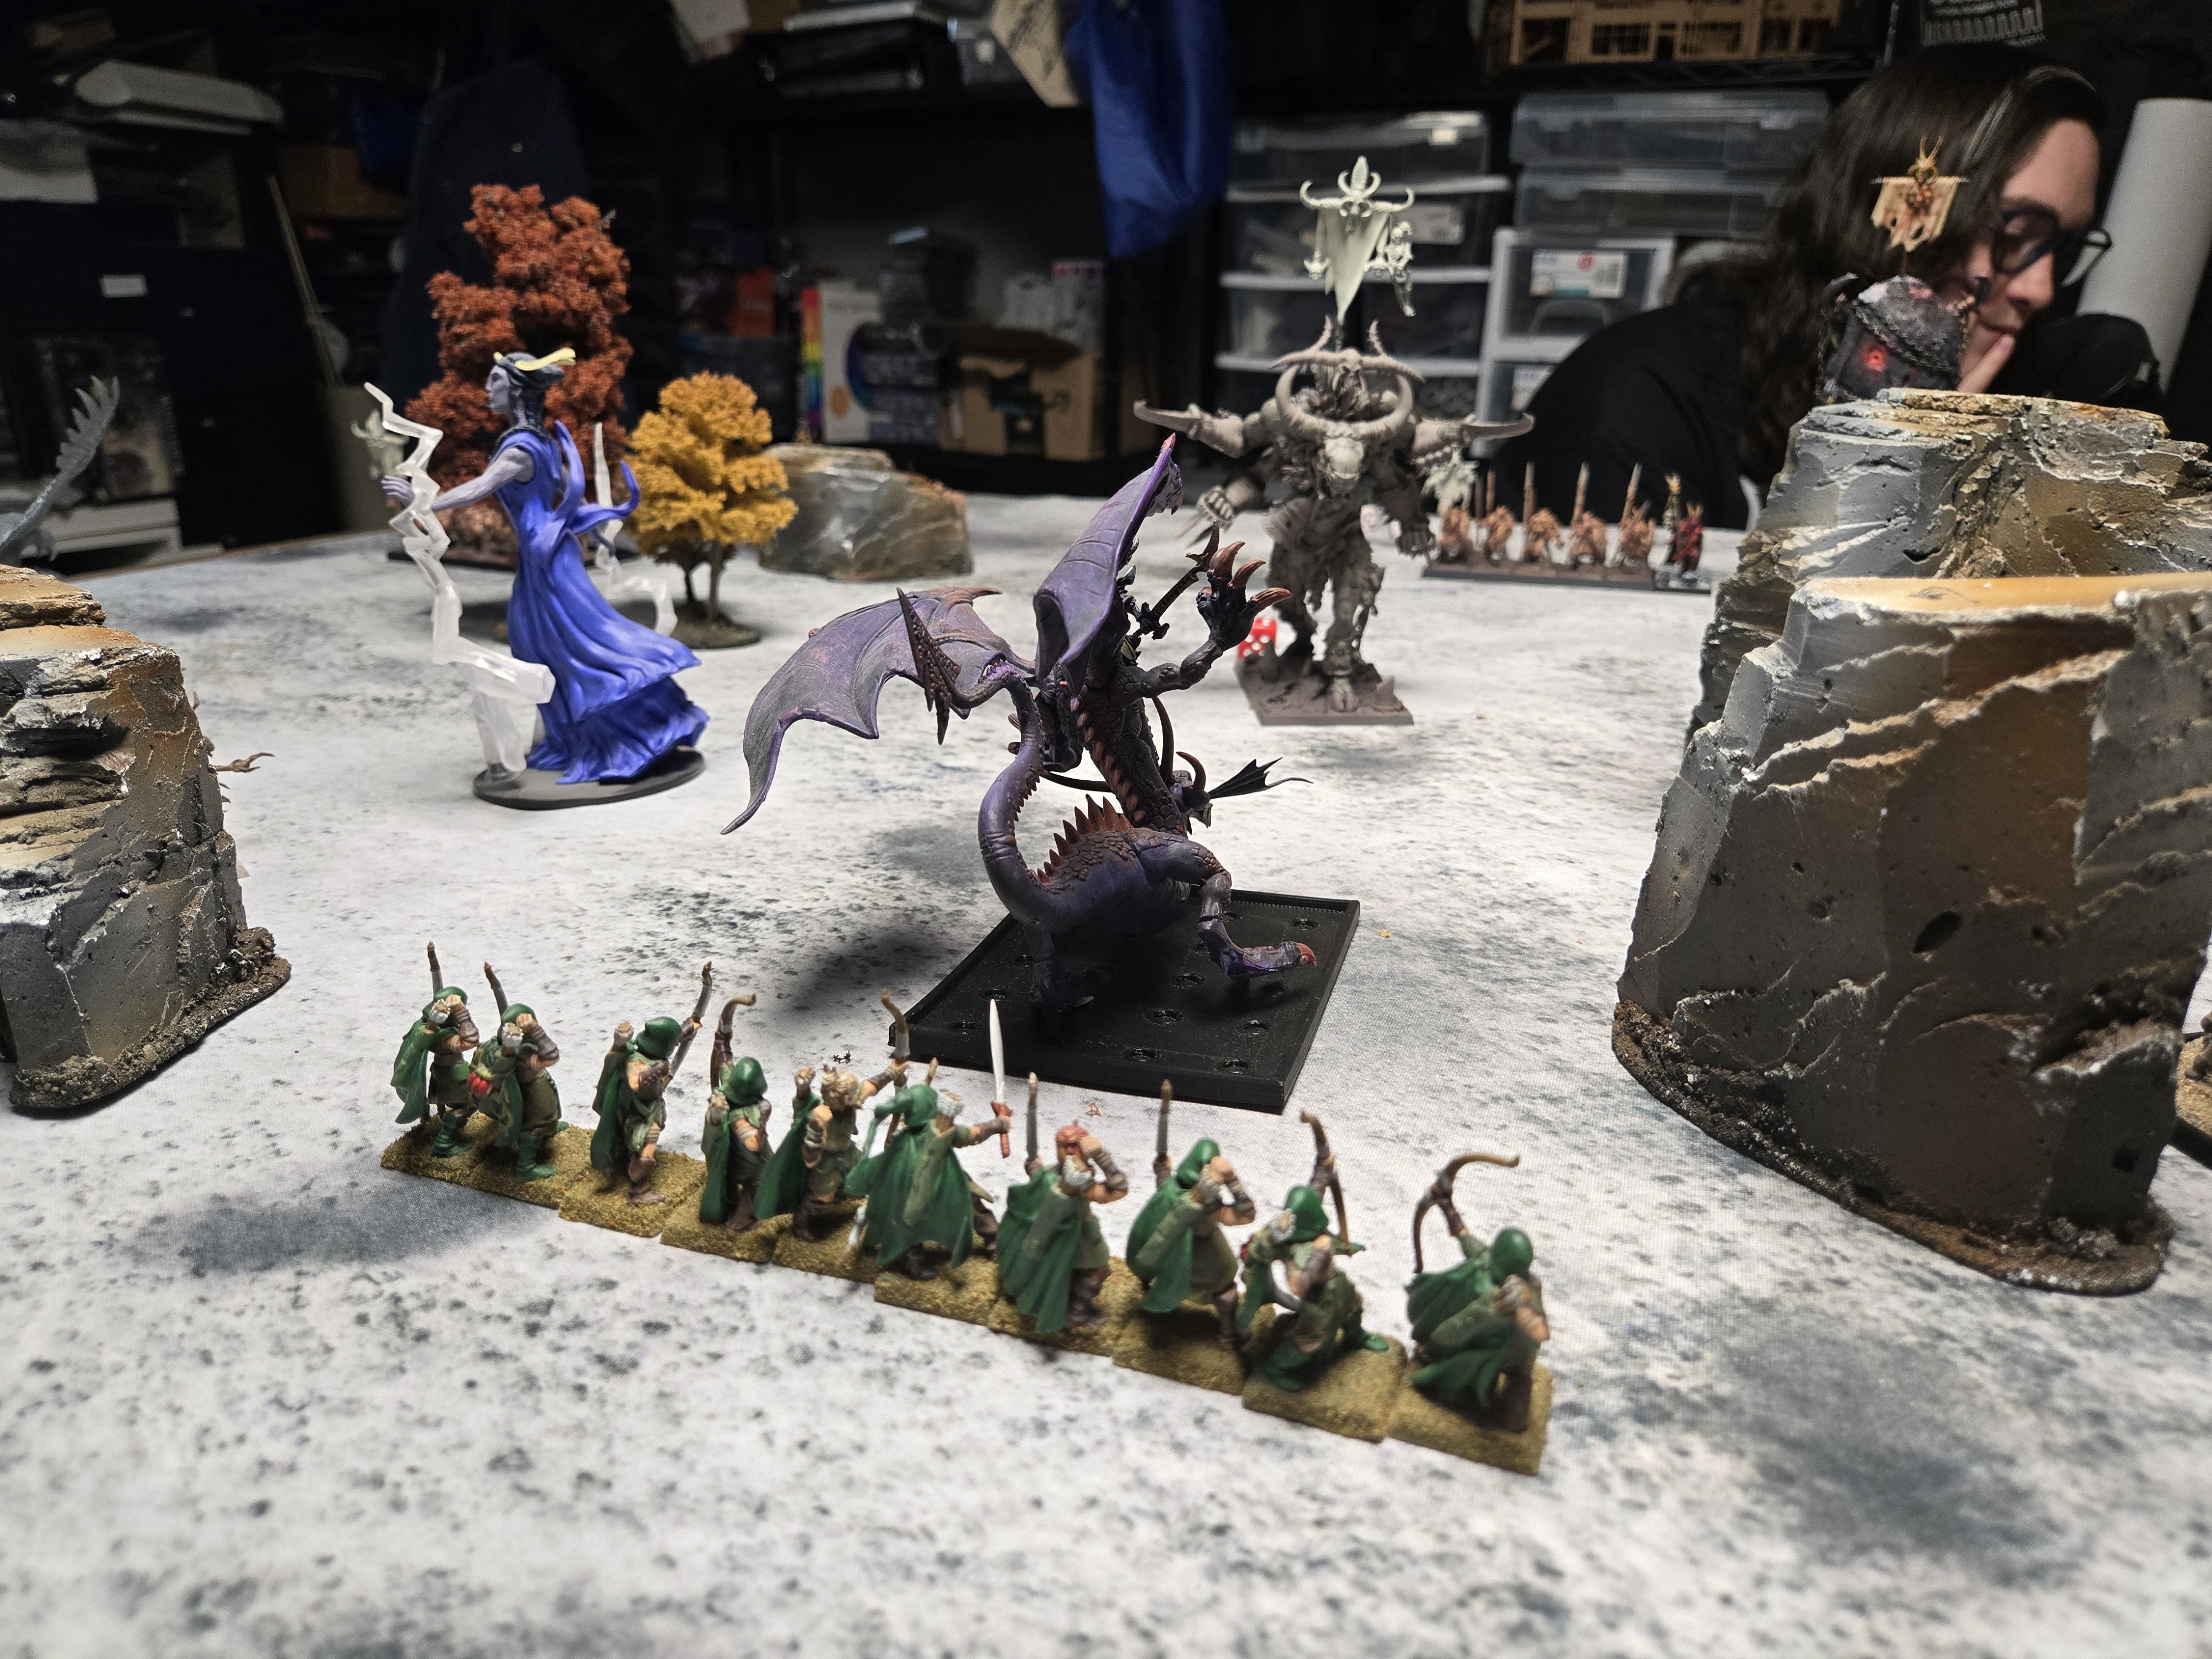
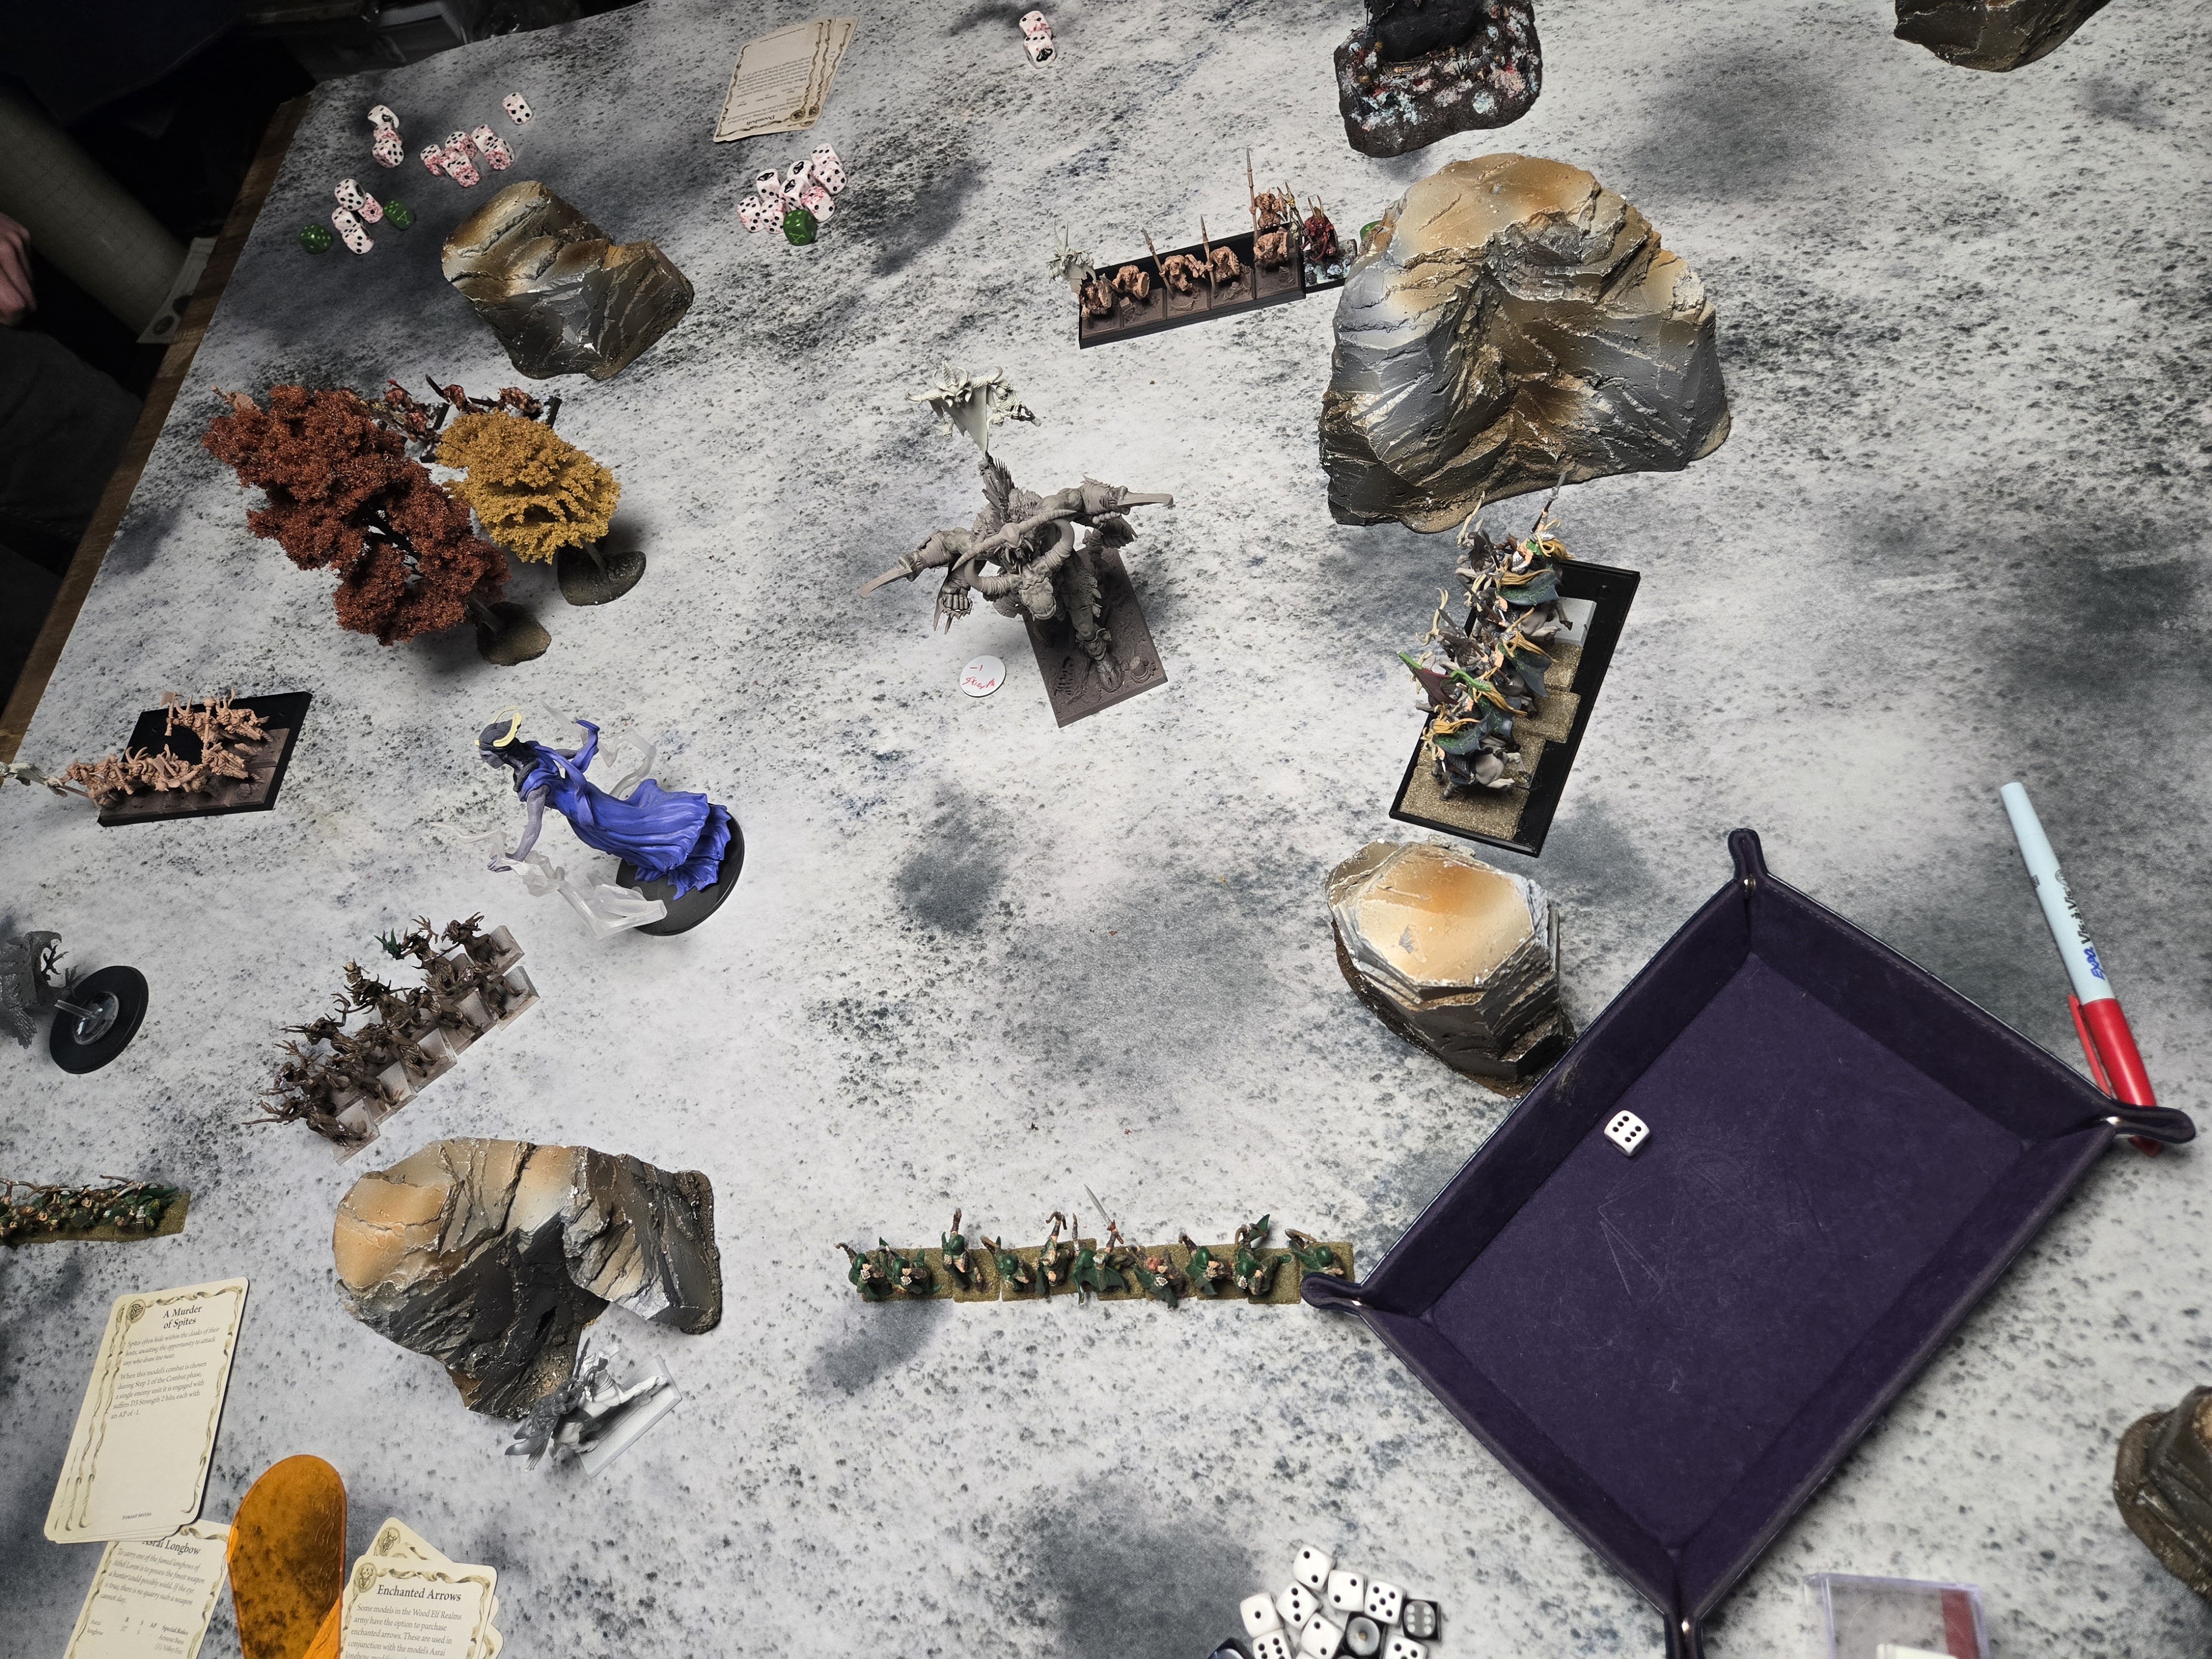
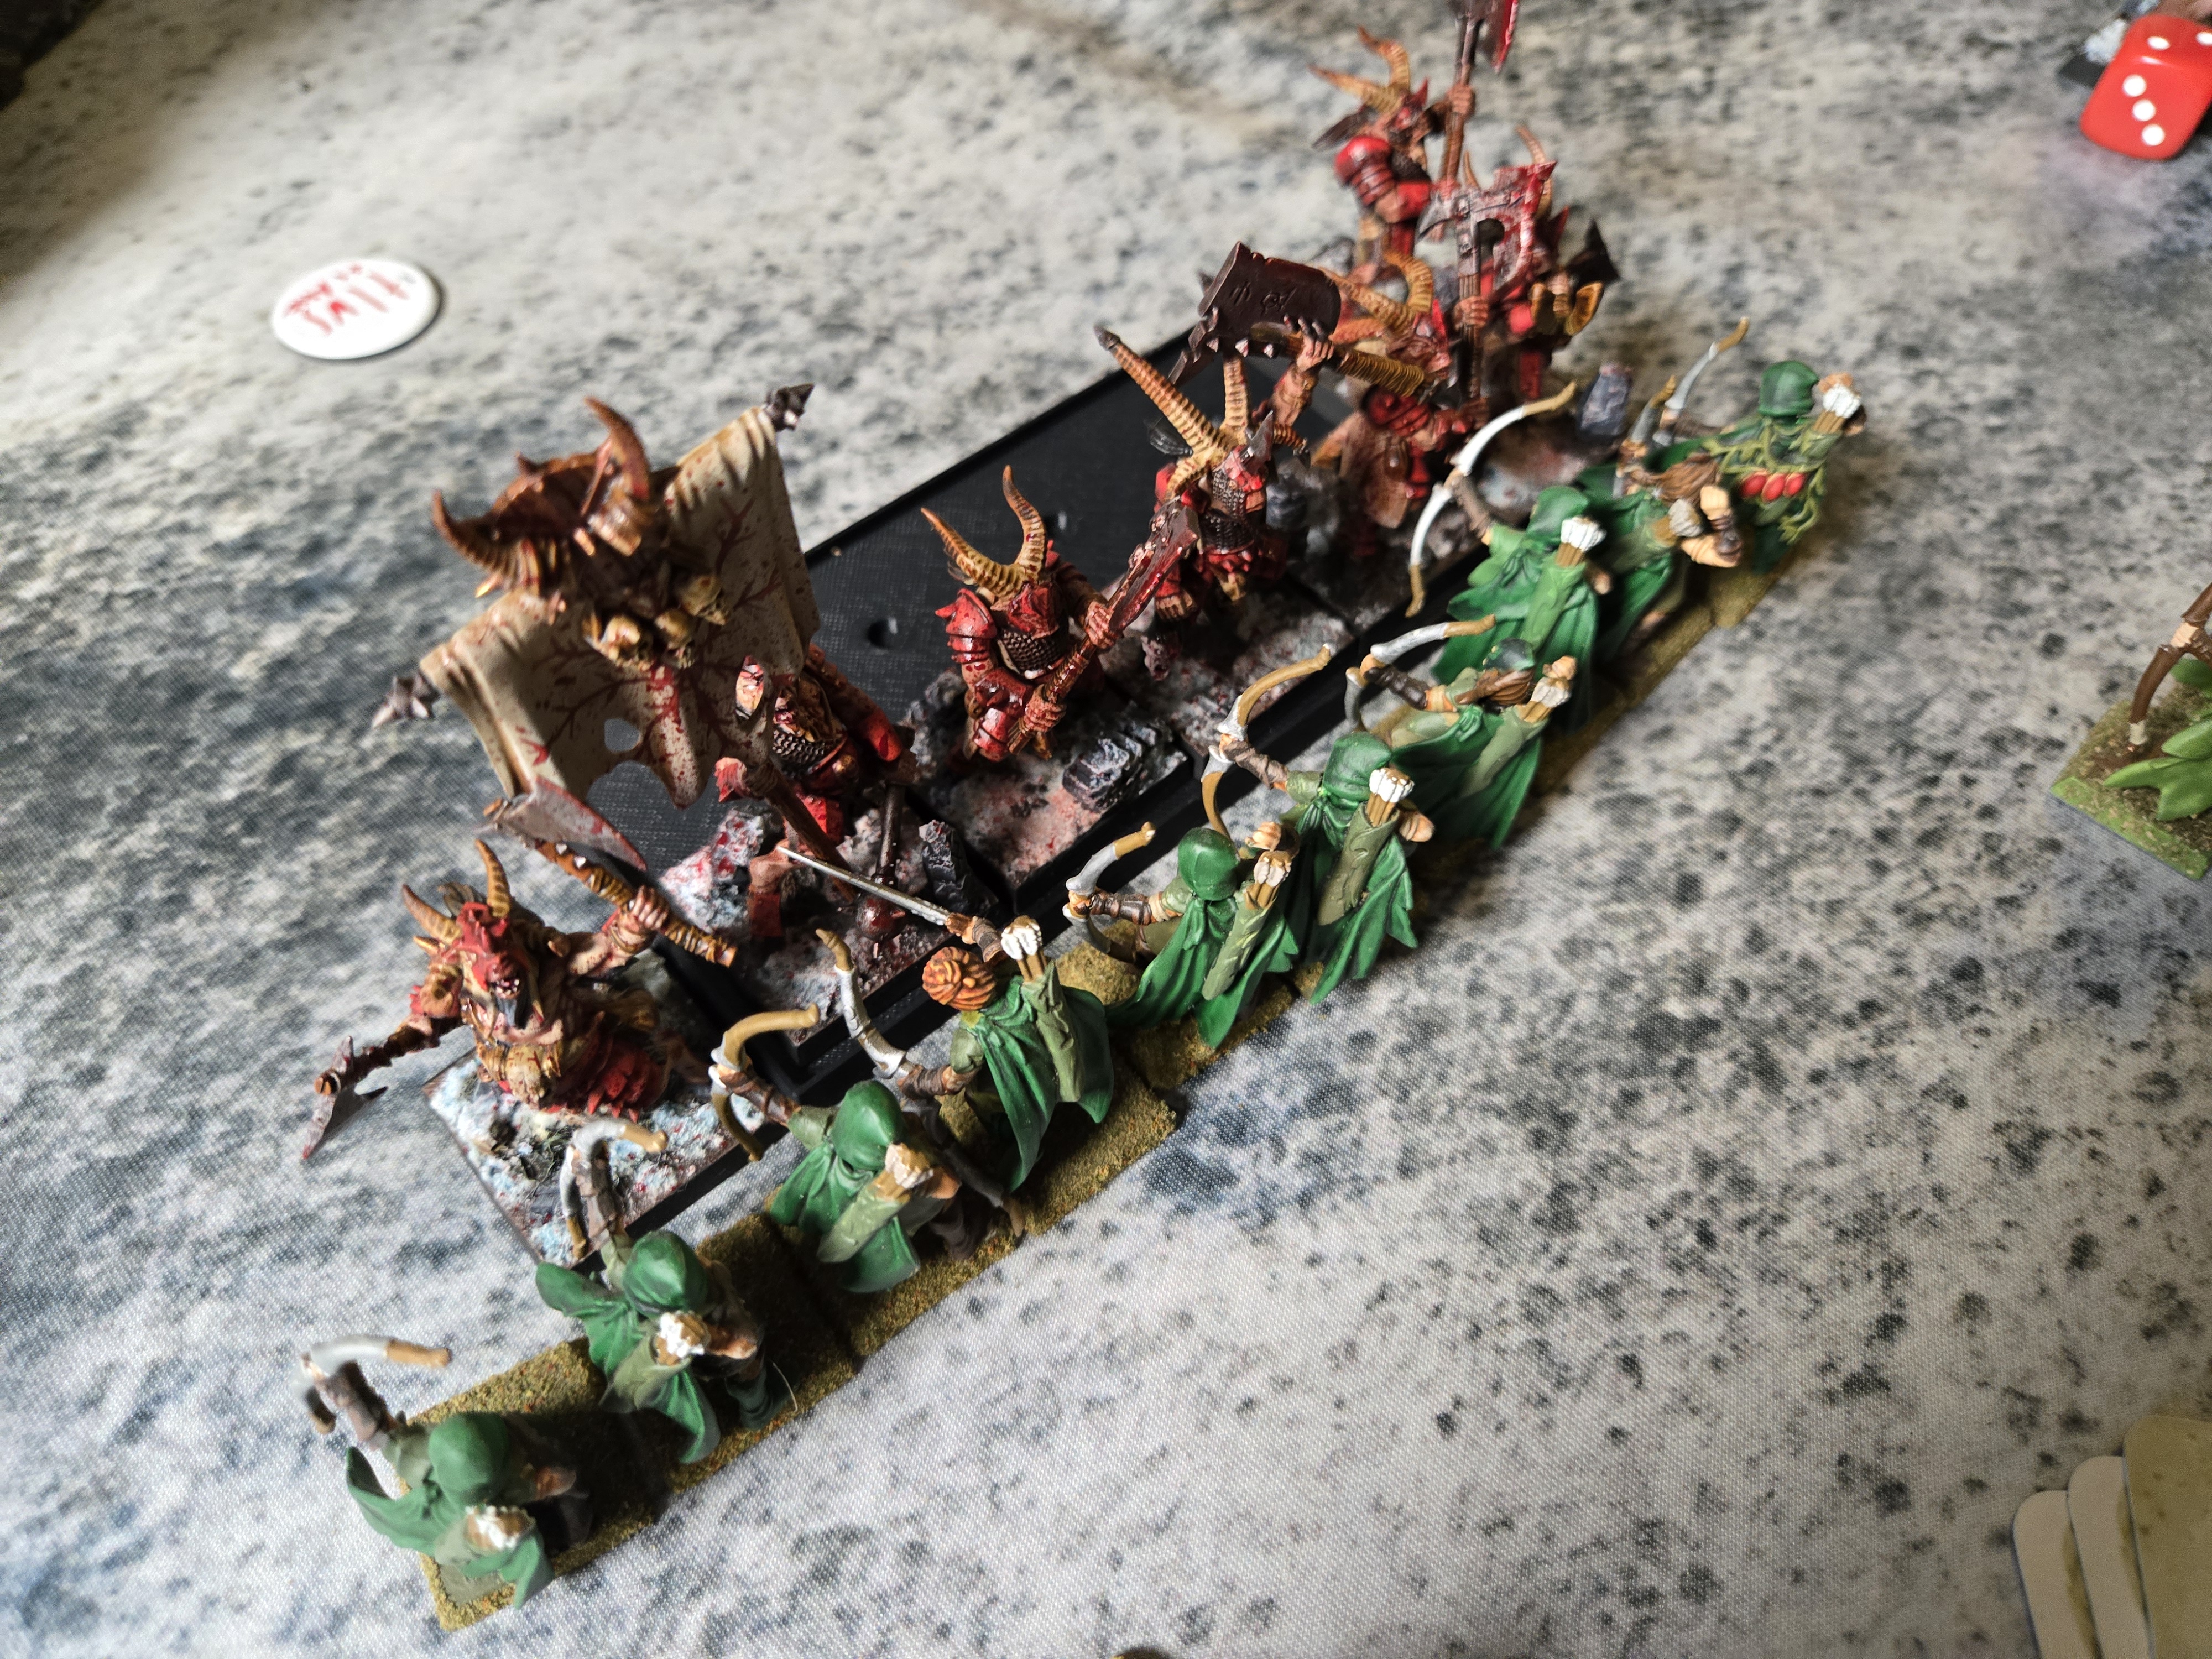
The other day, my friend came over and we had a good old-fashioned brawl with our Old World armies. I brought 2500 points of Wood Elves, and they got 2500 Beastmen.
Conclusion
The game was very close. I think the entire game hinged on turn 3 combat. One crucial item is that I turned to flee with my Wild Riders when charged by the Ghorgon. However, I didn’t flee far enough, and the entire unit was run down and destroyed with not a peep. I also didn’t prioritize my shooting well, and I forgot my hagbane arrows, which did much damage. I also didn’t utilize my forest sprites or my spells effectively. Live and learn.
I was happy with my Glade Guard and Glade Riders. The treekin did ok, and the eagles, I think, are essential to screen troubling units. I would have rather had another unit of the Guard rather than the Sisters of Thorn.
The game mat is by FLG, and the terrain was made by Greenleaf
Beastment
272 – Beastlord, Additional Hand Weapon, Heavy Armour, Many-limbed Fiend, Gouge-tusks, General, The Black Maul, The Fur of Sharggu 330 – Great Bray-Shaman, Gnarled Hide, Pelt of Midnight, Wizard Level 4, Dark Magic, Scimitar of Skultar, Full Plate Chaos Armour, Horn of the Great Hunt 210 – 10 Bestigor Herds, Stubborn, Veteran, Gouge-horn, Standard Bearer, The Beast Banner, Musician 177 – 15 Gor Herds, Additional Hand Weapon, True-horn, Great Weapon, Scimitar of Skultar, Standard Bearer, Magic Standard, Vitriolic Totem, Musician 177 – 15 Gor Herds, Additional Hand Weapon, True-horn, Great Weapon, Scimitar of Skultar, Standard Bearer, Magic Standard, Vitriolic Totem, Musician 85 – Tuskgor Chariots 77 – 10 Ungor Herds, Shield, Throwing Spear, Half-horn, Standard Bearer, Musician 77 – 12 Ungor Herds, Shortbow, Half-horn, Standard Bearer, Musician 205 – 3 Dragon Ogres, Heavy Armour, Great Weapon, Shartak 100 – Herdstone 329 – 6 Minotaur Herds • 1x Minotaur, Great Weapon, Musician • 1x Minotaur, Great Weapon, Bloodkine, Burning Blade • 1x Minotaur, Great Weapon, Standard Bearer • 1x Minotaur, Great Weapon • 2x Minotaur, Great Weapon 215 – Cygor 245 – Ghorgon
WoodElves
Glade Lord w/ Cav Spear, Forest Dragon, Hail of Doom Arrow
449
Spellweaver, Level 4 Wizard, Elven Steed, Heartwood Pendant, Lore of the Wilds
214
Treeman Ancient
265
Glade Captain, Battle Standard Bearer, Elven Steed
113
4×10 Units of Glade Guard with Hagbane Tips
130×4 520
10 Glade Guard with Moonfire Shot
120
10 Dryads
130
5 Glade Riders with Trueflight Arrows
95
5 Sisters of Thorn with Handmaiden
128
5 Wild Riders with Standard
142
4 Tree Kin
204
2x Great Eagle
2×60 120
Our initial deployment and round 1. Minimal movement and lots of shooting. The Storm giant in the middle of the picture is my vortex spell.
The right flank looked rough, with me facing down the enemy minotaurs and dragon ogres. I was able to kill 2 minotaurs in the first round of shooting.
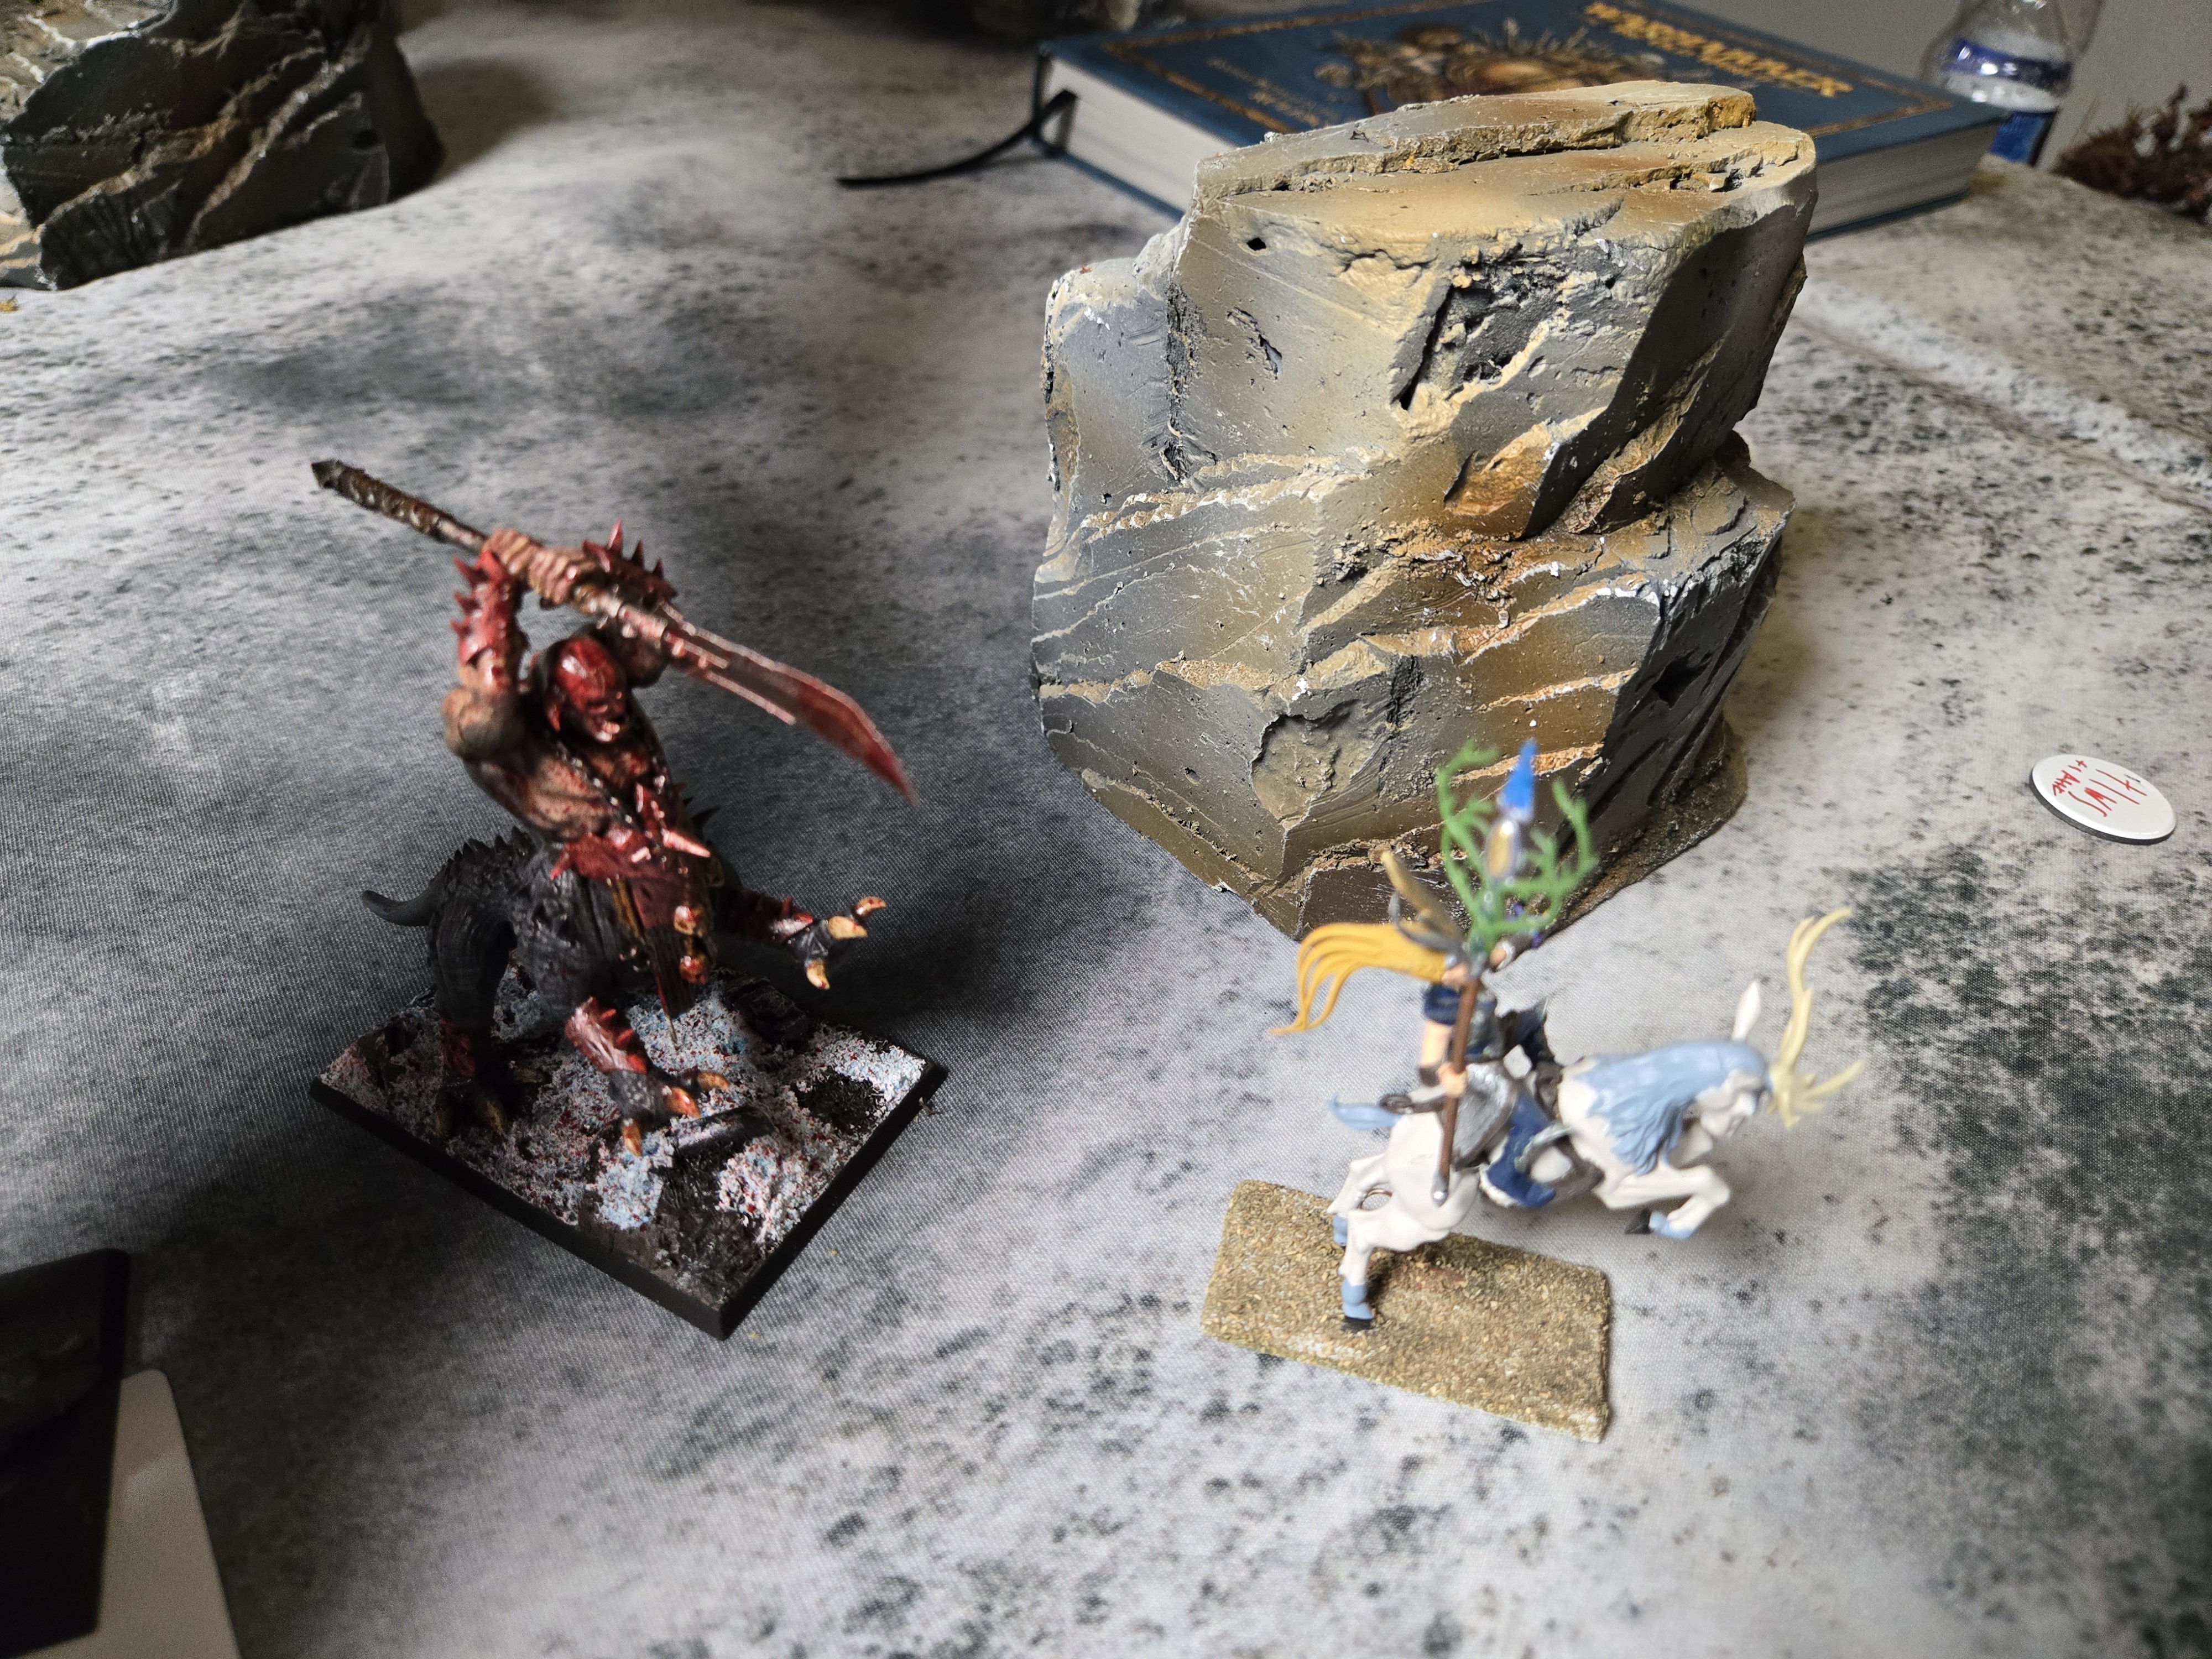
Round 3 resulted in the Ghorgon taking on the Woodelf Dragon. Unfortunately, the single six that was rolled into another six meant the monster slayer, Ghorgon, killed my general.
Center of the board after the turn 3 onslaught. My wildriders missed their charge.
Turn 5 meant their main lines could finally get to my bladeguard. It wasn’t pretty.
A rather funny image of his final dragon ogre chasing my final sister of the thorn.
Most people are unaware of the brutal battles that occurred in North America during the height of the fur trade. Europeans exploited Native Americans across the continent to hunt, trap, and export valuable furs across the ocean. Various European countries allied with different tribes, providing them with weapons and armour to make war against one another.
The Beaver Wars were a series of skirmishes that occurred over approximately 100 years in the Great Lakes region. It pitted the English-backed Iroquois League against the French and Huron.
Wargame Scenario
I would use A Few Acres of Snow, Sharp Practice, One Brain Cell Rules, Blood and Steel
Set up, create a 4×4 board with 7 or 8 models per side. Fill the board with trees, lakes, ponds, rivers, streams, a cabin or two, and place fur markers or objectives around the map.
Models, Warlord has some native American skirmishers to paint and such. You can also use the generic plastic native american models you get from the dollar store.
Each side must identify the objectives and escort them off the table. You could randomly assign a value to each objective, and whoever wins the most value wins the scenario.
On July 29, 1148, Crusader Armies fell back from Damascus instead of taking the city due to differences among the Crusaders. We are going to storm the city instead.
Siege battles are a challenge to wargame. You can never bring the whole situation to the table, considering all the walls, gates, towers, fatigue, starvation, civilians, and so on, into play.
Crusaders Kingdom of Jerusalem Byzantine Empire Holy Roman Empire Kingdom of France 50,000 Led By: Baldwin III Everard des Barres Conrad III Louis VII Thierry, Count of Flanders
Muslims Burids Zengids Led by: Mu’in ad-Din Unur 15,000 Defenders
Wargame Men of Iron, or The Art of Siege, or other Medieval Wargame that has good siege rules 2-5 Players 4×8 Table Terrain, build a city with a second set of defenses. The weakest wall, according to historical records, is not a standard straight wall, but instead has several jags and curves to accommodate the landscape. The streets should be narrow, at most 1BW, and also not straight. Models, build armies as they would have been historically; there should be a 2.5:1 advantage for the crusaders. Also, ladders and rams would be the primary siege equipment due to the short timeline.
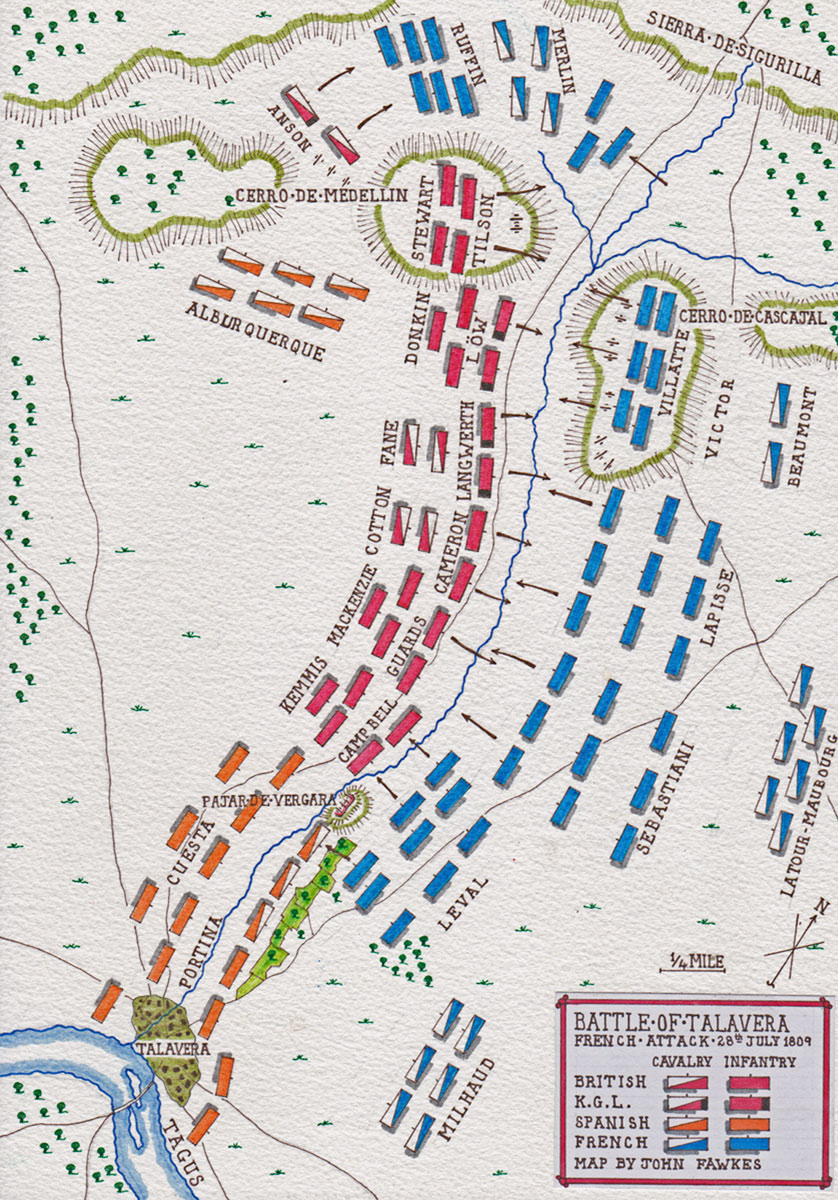
My other favorite period of gaming happens to be the Napoleonic era. The Peninsula campaign can make for some great games with epic battles. On July 28th, such a battle took place where Arthur Wellesley began the campaign to retake Spain. Wellesley, as he did famously at Waterloo, forced an engagement, but played a defensive role in the battle.
France Joseph Bonaparte (41 Battalions, 56 Squadrons, 13 Artillery Batteries) 46,138 Soldiers 80 guns
Wargame 2- 20 Players (If more than 3 use an umpire). Each player could easily control a division, corps, or faction. Rules, General D’Armee, or any other large-format Napoleonic Wargame Table 16×8 for 15mm, smaller for 6mm The terrain is arid, with some bluffs; the river did not really apply much. Use the order of battle to determine troop quality. It could help balance the game by making the Spanish closer to the militia.
Scenario The French should be the aggressor and attempt to move the British and Spanish forces from a defensible position. The French should have a higher quality of troops than the Spanish.
My absolute favorite set of wargames to play is fleet-level engagement. In outer space, or WWII, or the Age of Sail, or Galleys. It doesn’t matter, I enjoy fleet battles. When one of the famous naval battles from history hits my calendar, I am going to do a scenario about it.
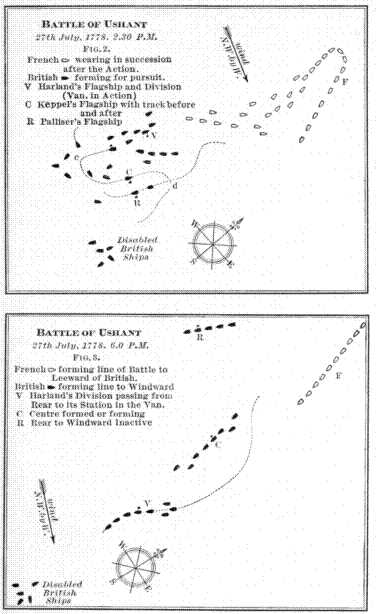
The Battle of Ushant was about as close to a non-battle as possible. The French were instructed to avoid battle at all costs, while the British failed to properly engage. We will simulate what might have happened had the sides actually engaged.
Great Britain Augustus Keppel 2470 Total Guns 30 Ships of the Line – 15 74 Third Rates – 1 80 Third Rate – 7 64 Third Rates – 6 2nd Rates – 1 First Rate 6 Frigates – 1 32 Gun – 4 28 Gun – 1 20 Gun Two Fire Ships One Sloop
France Comte D’ Orvilliers 2322 Total Guns 30 Ships of the Line – 12 74 Third Rates – 11 64 Third Rates – 2 80 Third Rate – 1 70 Third Rate – 1 Second Rate – 1 First Rate – 2 Fourth Rate 7 Frigates all 32s 6 Corvets Totaling 52 Guns
Wargame Rules Black Seas or Other Rulset Table Size 16×8 Players 2-8 No Terrain
Wargame You can fight this battle two ways, either A go at it as admirals. The French should have superior mobility but inferior firepower. The other option is that historically, the French needed to tack across the British line of battle to escape to the open ocean. Set the weather gauge between the two fleets, and the French must flee without losing any of their ships of the line.
The worst defeat of the early Byzantine era. The emperor himself was slain in what was more of a slaughter rather than a battle. The Byzantines had just finished sacking the city of Pliska. While they were in the city, the Bulgarian’s hid amongst the narrow mountain passes to ambush the Byzantines.
Bulgarian Empire Krum 18,000
Byzantine Empire Nikephoros I 22,000
Wargame Scenario In this solo wargame you are to prevent the loss of your forces by scouting the woods and valleys up ahead.
Set up a forested area and divide your table into 16 equal sized squares or rectangles. Your scouts must find the enemy and return to your lines to warn your king. You have ten rounds to find the enemy. Each round you can move one square and investigate. Or move two squares. You must be in the same square as the square you want to investigate. Use the joker card to indicate where your forces are located.
Get a standard playing cards, take out a joker, take out all of the hearts (or whatever suit you want) and three cards of a different color aka spades or clubs. The cards of a different color indicate where the enemy is hiding. To investigate you turn over the playing card and if it is one of the cards that is a group of enemies. The enemy can also move two squares. Once you discover one of the enemy cards, reveal all of the facedown cards and the enemy cards are left on the table. Move the enemy cards to try and block your escape. If the enemy is able to pin you in you lose.
The 1467 Battle of Molinella was one of the most important battles in 15th-century Italy. It is also one of the first battles where firearms and artillery were extensively used. The battle resembled a pike and shot era battle more than a medieval one.
Wargame Use whatever rules you want to. If you have a good late medieval or early Renaissance rule set that incorporates firearms well, that would be my recommendation. 2 Players 8×4 Table For terrain, the battle was fought on the banks of the Idice River. Some minor hills, some shrubbery, and of course, the river on a short table edge.
Set-Up The two armies should be relatively balanced; your rules set will have good army lists. The Italian Condotta Army from DBM Book 4 can make some nice lists.
While Scotland was fighting the English for independence, it was also fighting among itself. Similar to Japanese Shoguns, Scottish clans vied for supremacy. Alexander Stewart attempted to take on a numerically superior force. He was confident in his heavily armed knights and men-at-arms.
Scottish Crown and Duke of Albany Alexander Stewart, Earl of Mar 3,000 Infantry and Heavy Knights
Lordship of the Isles Donald Islay, Lord of the Isles 10,000 Infantry, mostly peasant militia
Wargame Use DBA or DBM or similar rulesets. 2 Players
Instead of points, the Lordship of the Isles should have 3x the number of stands as the Scottish Crown. The Scottish crown should have heavy armor and elite knights and infantry, roughly 50% of each, with no archers.
The Lordship of the Isles should have warbands, peasants, and some psioli, such as peasant archers. They could also have a small number of spearmen.
Set the table as you wish; traditionally, the battle took place over open ground in the Scottish highlands, where there would be shrubbery and rocky outcroppings.
The objective for either side is to win the day. This is a simple battle of elite vs. numerical superiority. I did not try to balance the battle based on points.
Today, I wanted to try a slightly different style of game. The Egyptian revolution of 1952 was a coup that ended the Muhammad Ali dynasty. It ended British influence in Egypt. An interesting point is that the United States supported the coup leaders against their British allies. Another interesting fact is that while the United States supported the coup, it was against the wishes of its British allies.
The goal of the game is to secure the exits to the compound so the sitting ruler can flee.
Set-Up
Create a large compound on a 4×4 with at least 8 exits. Lots of hallways, stairs, balconies, walls, and rooms with several exits, and anything else you can think of. As the revolutionary, you have 6 units to secure the 8 exits and pen in the leader. Your units can be placed on any edge of the table. The sitting ruler gets three models; one model should be labeled as the leader, the other two are decoys. This should be kept secret from the revolutionary.
Units can move up to 5″ every turn. The revolutionary can activate 5 units per turn, the sitting ruler can activate all 3. If any of the sitting ruler’s 3 models come within 2″ of a revolutionary unit, they are removed from the game, and it becomes known if they were a decoy or not.