On June 11th, 1865. Brazilian forces on the Parana River turned the tide of the Paraguayan War with a decisive naval victory. Panama attempted a surprise naval attack, but failed to account for the conditions of the battle.
Order of Battle
Paraguay Ignacia Meza
2 Corvettes 6 Steamboats 7 Barges Total 44 Naval Guns
Brazil Francisco Barroso
1 Frigate 4 Corvettes 4 Gunboats 58 Total Naval Guns
Intended Rule Set- Steamer Wars Models Needed: 24 plus coastal batteries River style water terrain with many small islands
Set Up
The Brazilian fleet should set at anchor near one table age. The Paraguayan fleet should be positioned to sail past the Brazilians.
Objectives
The Brazilian fleet must catch and deal significant damage to the Paraguayans. Paraguayans must sink at least one Brazilian ship and flee the table with their slower fleet. Barges should not count for losses to the Paraguayans.
On June 8th, 793, three Viking ships landed on the coast of the remote island of Lindisfarne. Lindisfarne was famed for its library and riches, making it a prime target for Viking raiders. The island was relatively undefended. This raid marked the beginning of the Viking Age in England.
Wargame Scenario should work nicely with the Barons War or even Warcry style games.
2 Players 50 Viking Raiders 20 Defending Men-at-Arms 40 Defenseless monks Flat grassy terrain with a stone building and a central monastery.
Objective
The Vikings’ goal is to steal as many treasures as possible. Their secondary goal is to kill as many monks as possible who are hiding treasures.
The defender aims to save everything they can, fleeing to the opposite edge of the table as the Viking raiders.
Set-Up,
Place a large monastery in the center of the table with a surrounding wall. The only gate should face the shoreline from which the raiders are arriving. Place a village outside the walls near the coastline. The rest of the table should be covered in random fields and orchards. There should be 10 defenders in the village itself and 10 more in the monastery. All 40 monks should be in the monastery.
The monks must flee from the gate and run to the opposite edge of the Viking raiders. Five holy relics should be placed on the field. Three in the monastery and two in the village. The monks are the only defenders who can move the relics. The Vikings will know who carries the treasures.
On June 7th, 1917, the British Second Army, led by General Herbert Plumer, began a costly assault on fortified German positions near Messines in Belgium. The British objective was to cut the Germans off from many ports they were using for resupply.
The British began the assault by detonating mines beneath the German lines, followed by a crawling artillery barrage. The infantry advanced with support from tanks, airplanes, and cavalry.
British Commander
Herbert Plumber 12 Divisions of 16,000 men each Cavalry, Air Patrols, Tanks
German Friedrich Sixt von Armin 5 Divisions of 18,000 men each.
Wargame
For use with Bolt Action WW1 or any other WW1 Wargame
Players: 2-4 Forces Needed: 1200 points or 2 platoon equivalents for the British and 800 points or 1 reinforced platoon equivalent for Germany. The British should have one tank, and both sides should have access to artillery and machine guns. Terrain Needed: A small hill with no man’s land before it. Table Size: 8×4
Set-Up
Place the small hill in the center of the table near one of the long edges. Fortify the hill with trenches, craters, barbed wire, and broken ground. That hill and that side of the table will be the Germans.
All forces should be placed on the table; the British should have the opposite table edge. Broken ground, crags, etc., should provide some cover for advancing British forces. All German troops should be dug in.
Objective
The British must take the hill, the Germans must defend it.
Special Rules
The British should get one artillery barrage at some point during the game.
If you are a wargamer, you know about D-Day. We aren’t going to wargame the most famous invasion in world history. We will wargame a special operation, the assault on the Merville gun battery by the 9th British Parachute Battalion.
Wargame
Rules Bolt Action or Command Decision Players: 2 Models Needed: (bolt action) 1,000 points of British Infantry. No tanks or other vehicles are allowed, but they do get their free artillery observer. 650 points of Germans, again, no tanks, only 2 MMGs are permitted, no mortars. Table 4×4 Terrain, a German bunker with trenches surrounding it, barbed wire, and an antitank ditch
Objective: The Germans must hold the gun battery inside the bunker, while the British must capture and destroy it. The game should last 6 turns. After turn 6, roll a D6 on a 4+, and we play a 7th turn.
Set Up: The British forces should be randomly distributed using a dice. This signifies the scattered nature of the parachute drop. For each unit, roll a D6. On a 1, remove one model at random from that unit.
The German forces should be dug into the trenches and prepared for battle.
The terrain should have the bunker surrounded by trenches, barbed wire, and an antitank ditch, then open ground with small bits of scattered cover, such as a shed, a small hedge, some rocks, etc. The bunker should face one edge with a semicircle of trenches surrounding it.
If you are struggling as the British player, add more troops or subtract a few Germans. Historically, the British could never capture this battery, and the Germans occupied it until they withdrew from France.
On June 5th, 1967, Israeli air forces launched a surprise attack against Egyptian airfields. The initial attack resulted in 338 aircraft destroyed for Egypt, and 19 Israeli planes downed. They also led with an armoured assault against entrenched Egyptian armoured forces. One of the war’s most contested areas was the 11km long Jiradi defile, a narrow pass defended by the 112th infantry brigade.
Wargame:
Ruleset: Team Yankee or other modern game Players 2-4 Models Needed: 30-40 Israeli tanks and armoured vehicles, plus two fighter jets, 10-15 Egyptian tanks and tank killers, 10 anti-tank batteries, 20-30 infantry. Table 8×4 Terrain: Two ridges are crucial to this, as the Israeli forces race through
Objective,
The Israelis must reach the end of the pass, preferably at the long end of the table, and the Egyptians must destroy 60% of the Israeli forces.
Setup,
The Israeli forces should be lined up in a column, and the pass should be wide enough for four to five tanks to be lined up abreast. The Egyptian troops should be dug around the ridges with some scattered infantry and AT guns in the trench.
Special Rules
Air Strikes: At this point in the war, the Israelis had air superiority. They could call in airstrikes throughout the battle to destroy various Egyptian emplacements.
On June 4th, 1859, during the Second War of Italian Independence, Napoleon III of France crossed the Ticino River to force the Austrian army under Gyulay to retreat. The Austrians had 68,000 men available and established defensive positions around the town of Magenta, securing four bridges.
The French, noticing the Austrian weakness, built a pontoon bridge to the south on the river, outflanking the entrenched Austrians and forcing their retreat.
The Wargame
RuleSet Blackpower or Other similar Game Players 2 Austrians 12 Battalions, 2 Cavalry Squadrons, 2 Cannon Batteries, 2 Battalions Garrisoning the Town French 16 Battalions, plus 1 new battalion every other turn, 2 dragoon squadrons Set Up. See the map below. Table Size: 8×4
Deployment:
The Austrians were surprised by the maneuver and were not in an adequate position. Most troops should be stationed in the field to the south of the road in the center of the map between the two sets of trees. The French should have half their units across the bridge, with the rest crossing. It takes one turn to cross the water. Only two units at a time can cross. Additional French units should arrive every other round or turn (however, your rules describe both forces getting to act as one turn). So total if the French never lose a unit, there would be 16 battalions, 2 dragoon squadrons, and an additional 12 French battalions.
Objectives:
The Austrians are fighting a rearguard action to hopefully prevent the complete destruction of their army. By nightfall, they must keep the French from reaching the town on the top left of the map. The attack took place at 2:00, so the French have six hours to reach that point. This amounts to approximately 24 turns for most games. The French want to get the town and surround the Austrians. The French must have forced back the Austrians; if the Austrians are fighting to the city at nightfall, it is still an Austrian victory. Losses do not matter here.
Special Rules;
The Austrians can garrison any building with half a battalion. The building becomes fortified and difficult for the French to move past.
The fastest route of travel should be the road. The area around the road is heavily wooded.
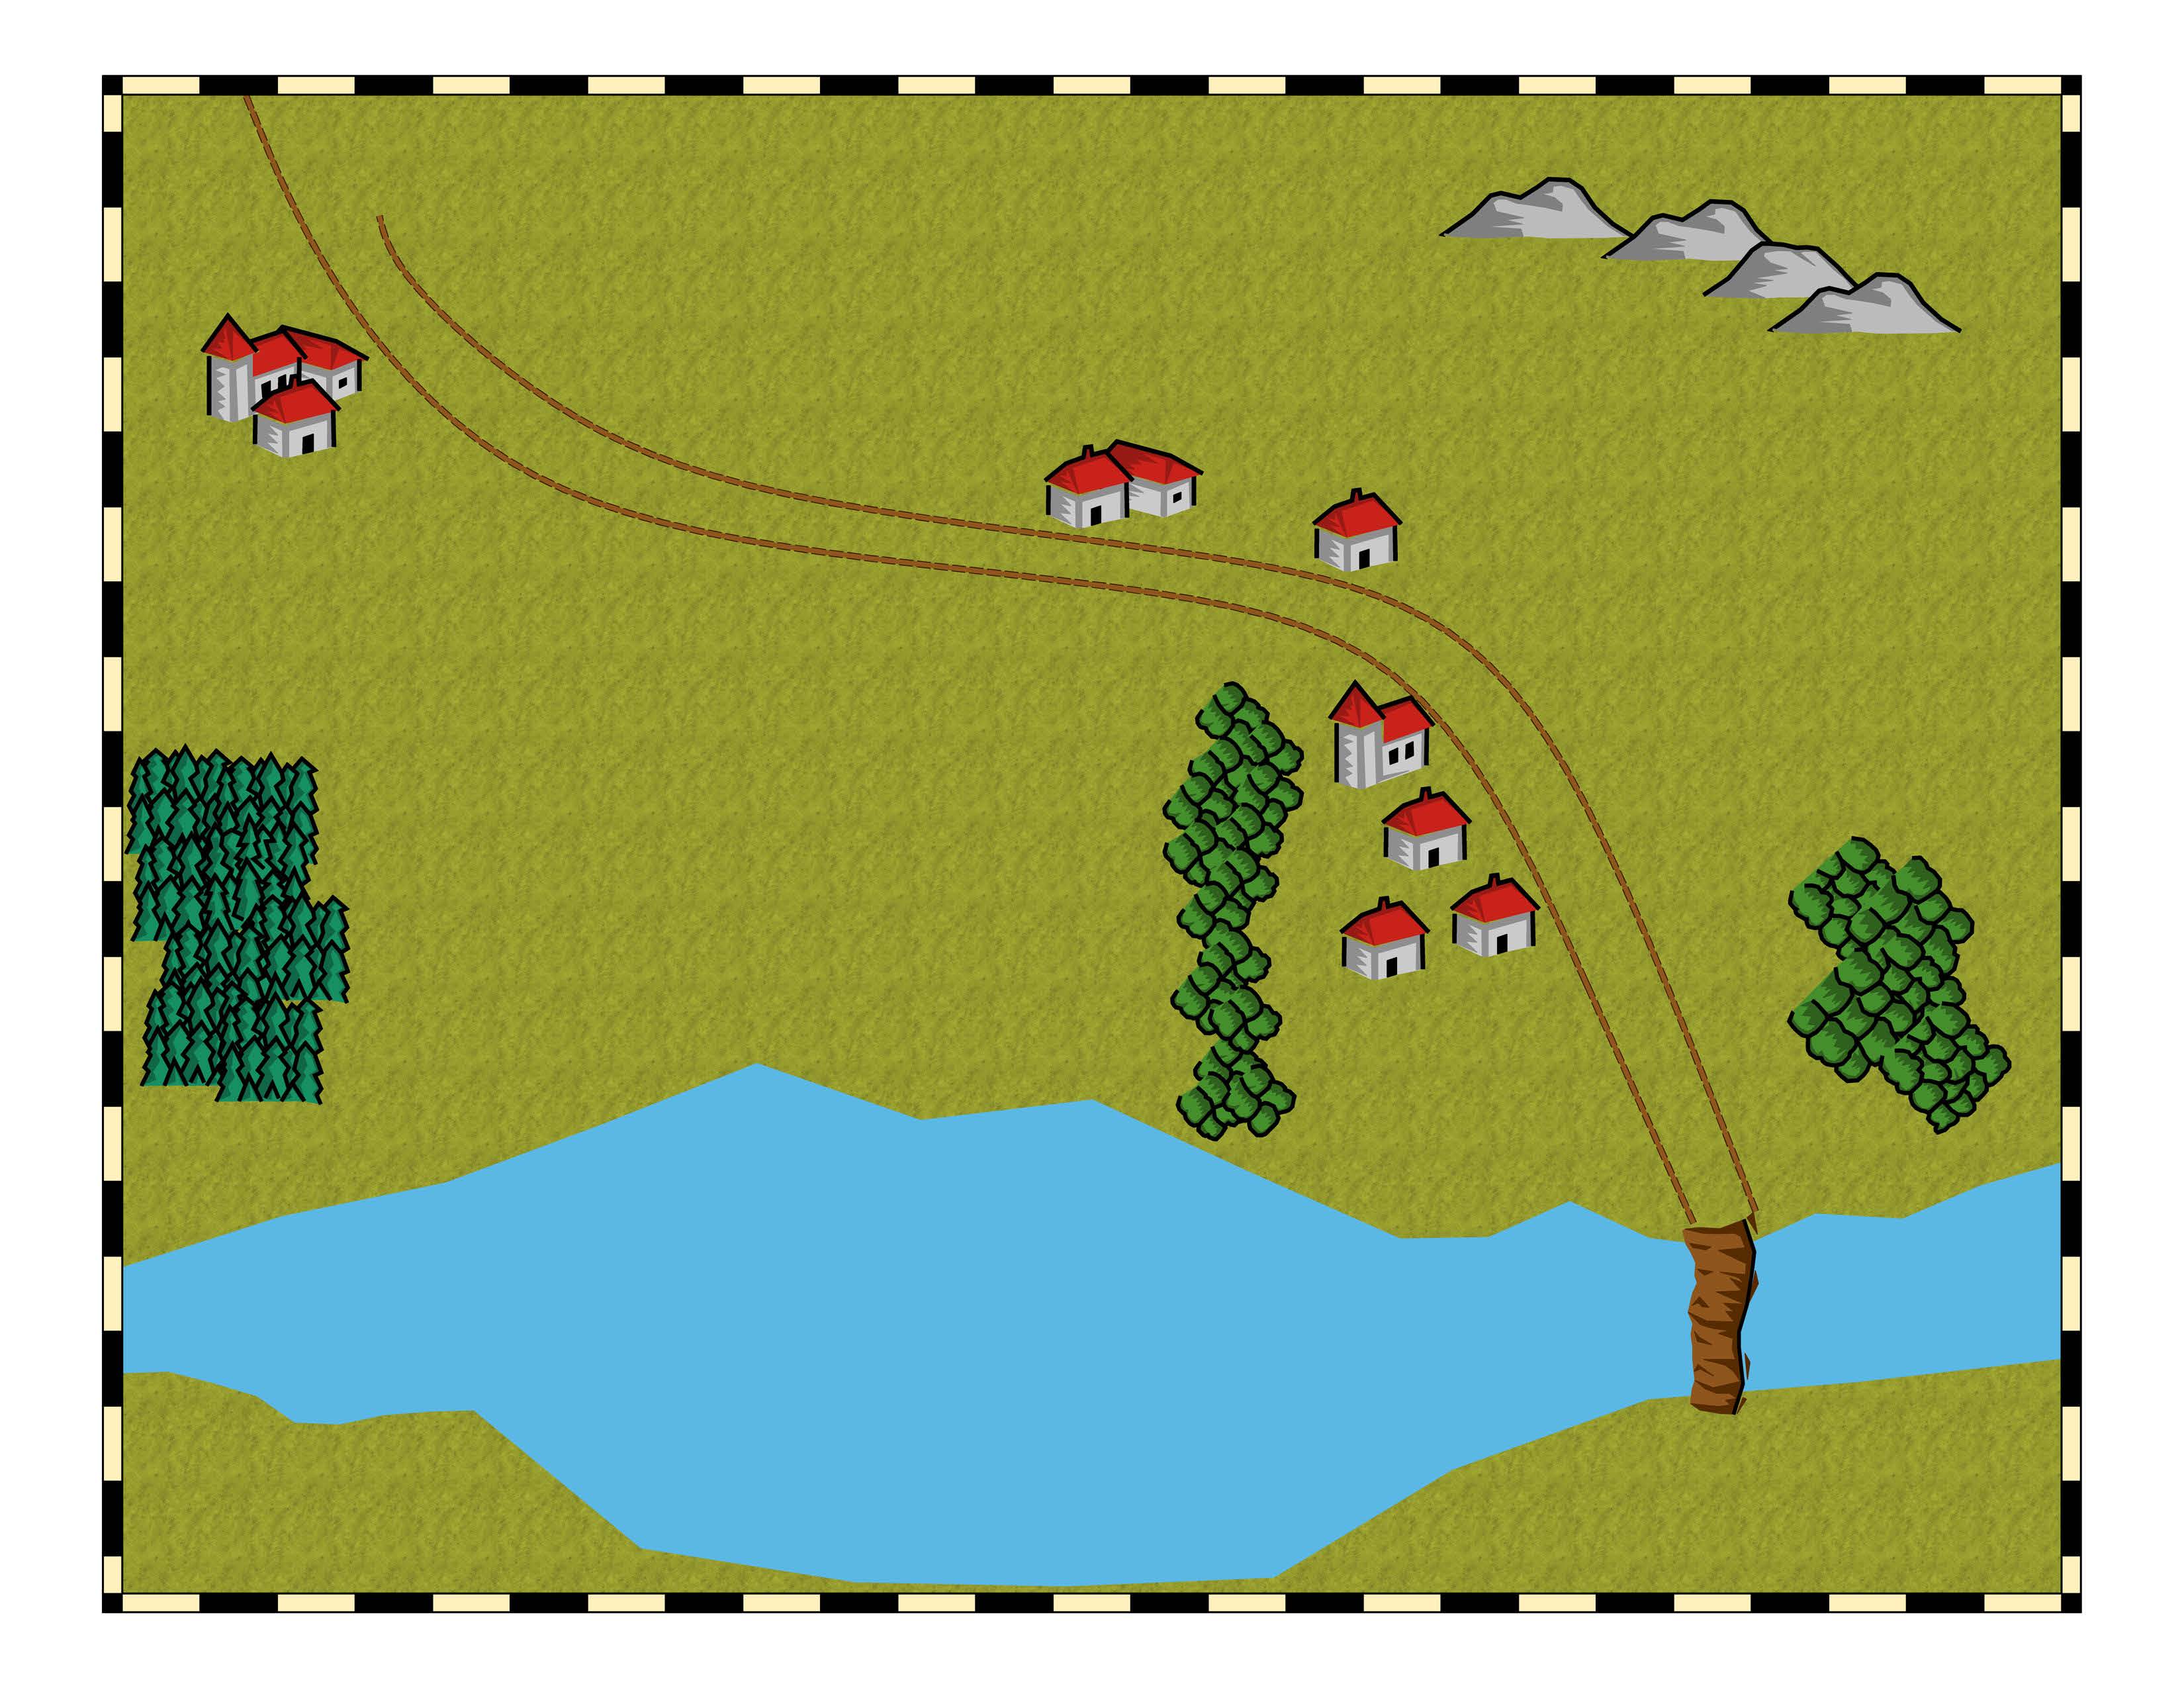
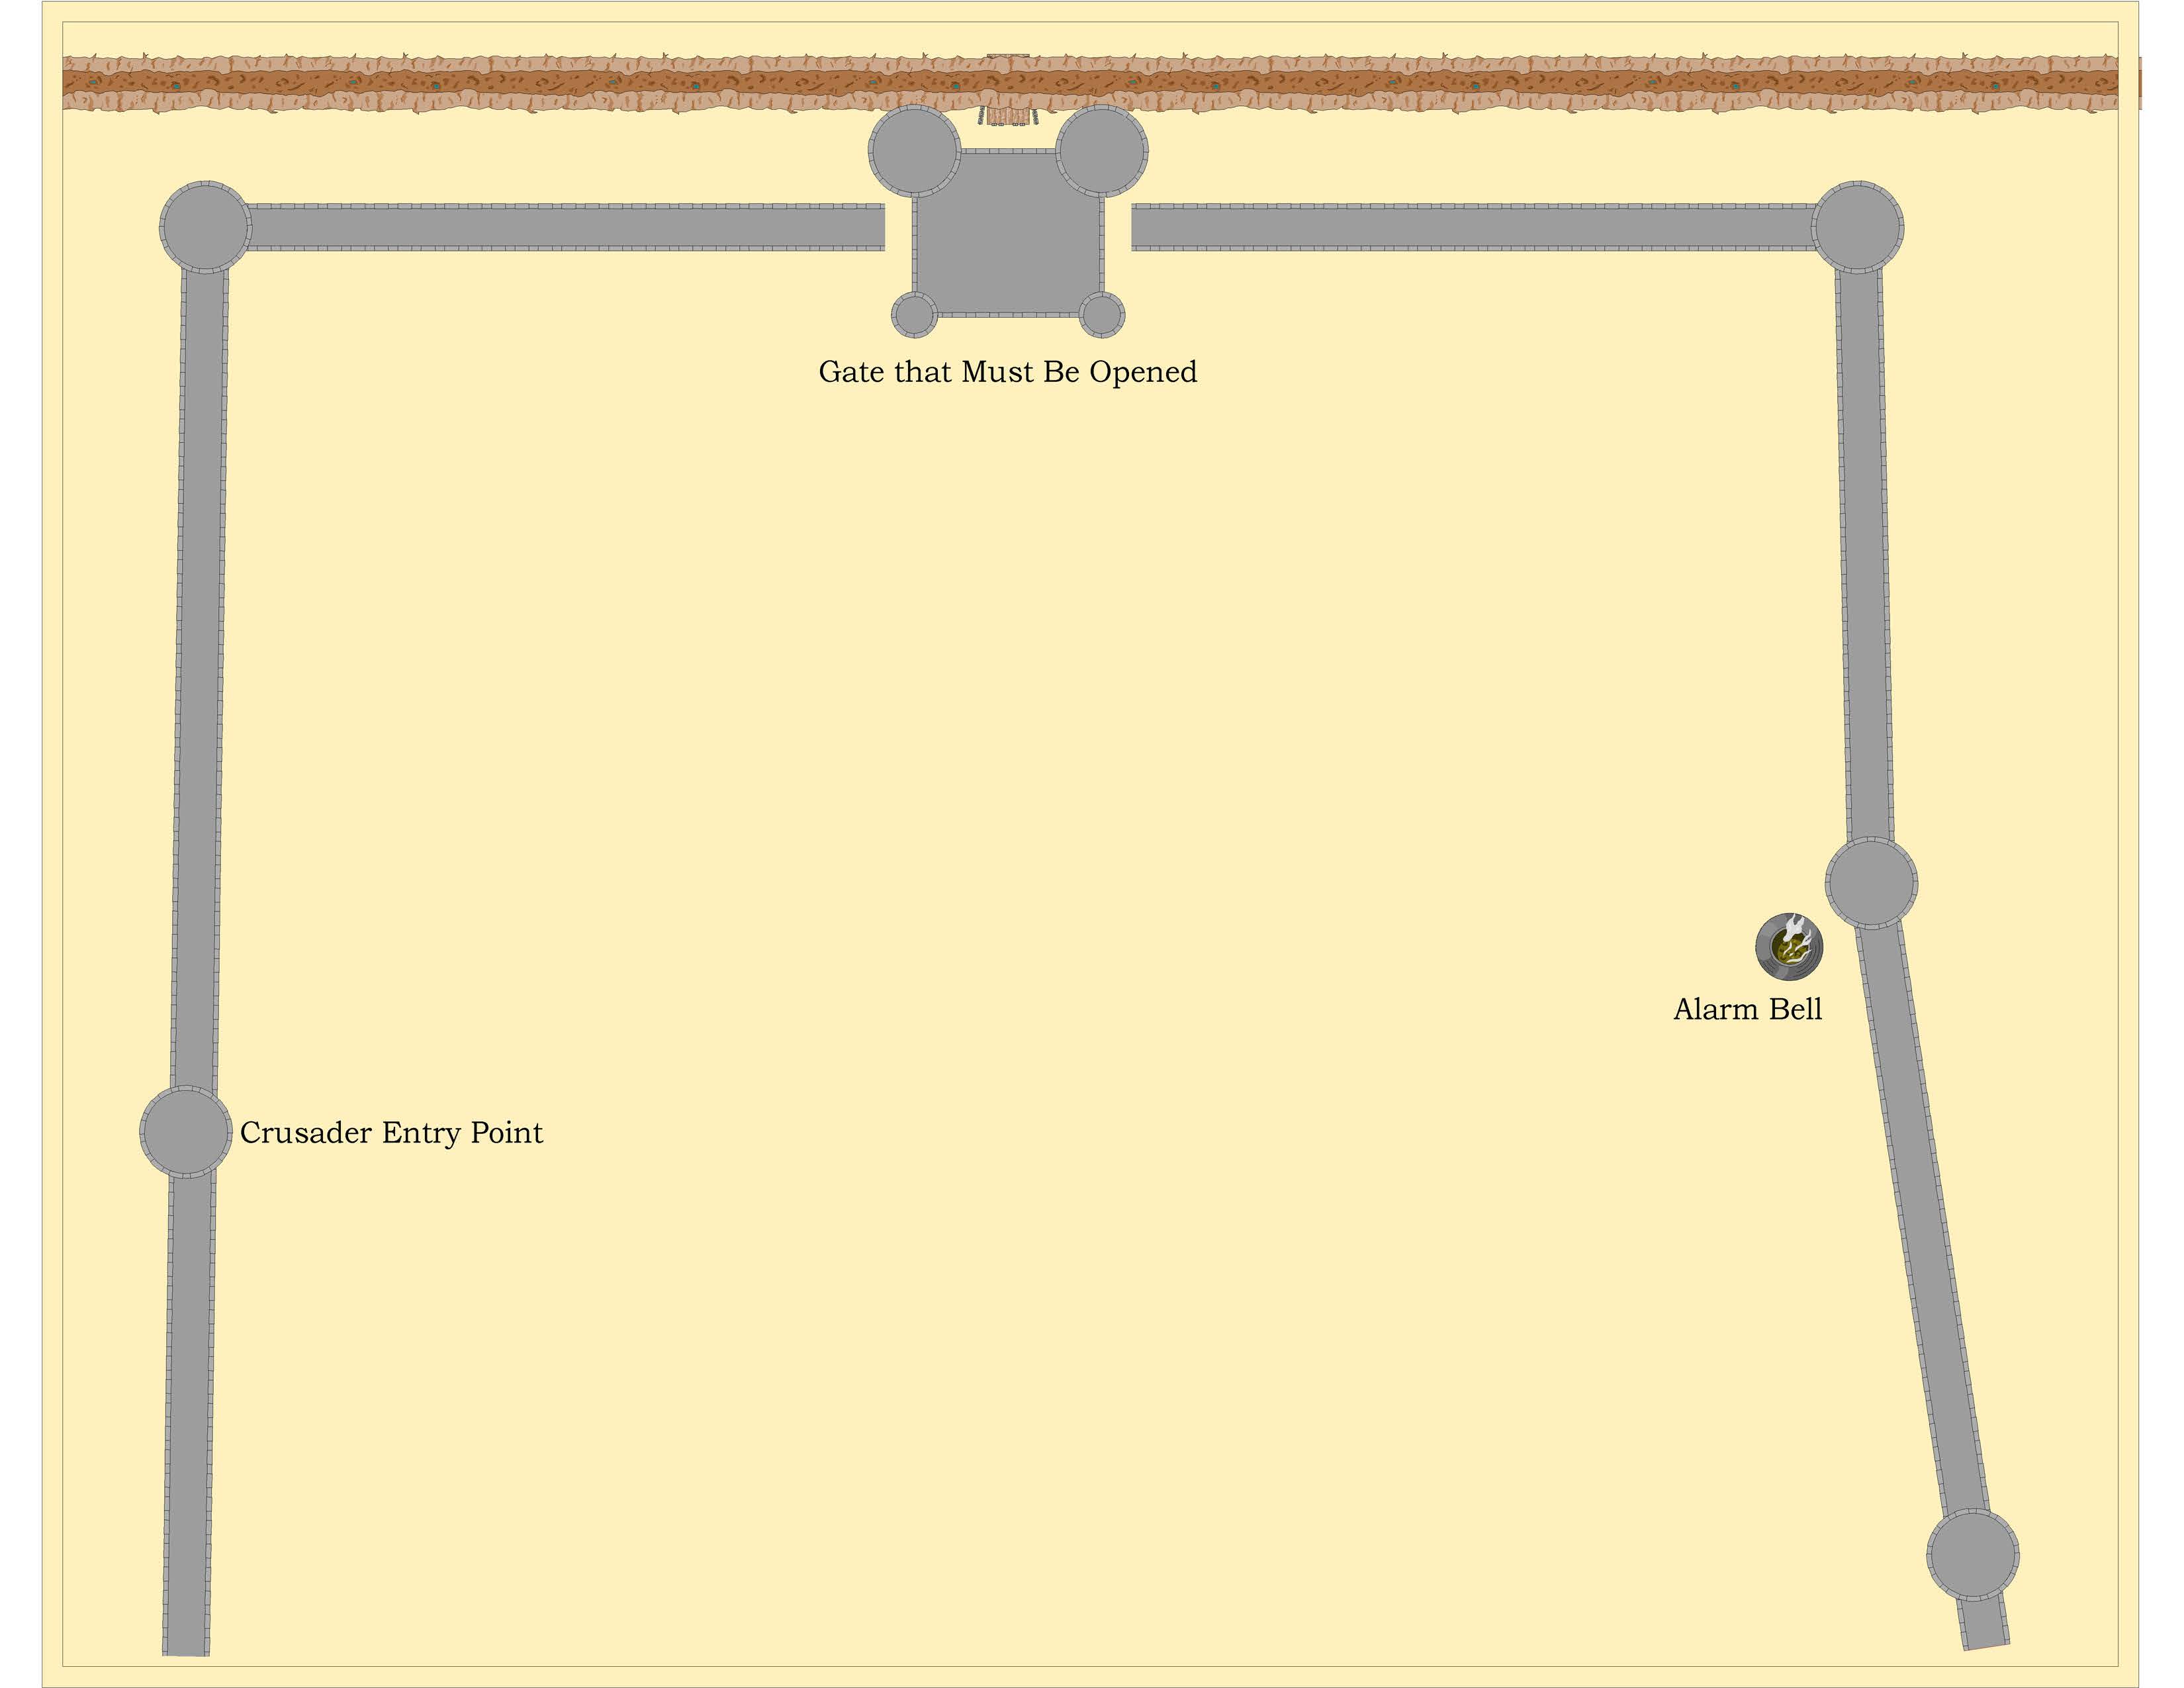
On June 3rd, 1098, following an 8-month siege led by Raymond IV of Toulouse, modern-day Turkey’s Seljuk-held city of Antioch fell to the crusaders during the First Crusade. The city fell due to treachery from one of the guard captains.
While a full campaign with 10 battles to capture and Siege Antioch and defend it would be ideal, I think a simple wargame scenario depicting stealth would be more appropriate for this blog.
The guards’ goal is to catch the attackers, while the crusaders must successfully reach the gates and open them for the waiting forces.
Wargame
Ruleset Custom
Number of Players 1 Number of Models 25 Play Area 4×4 Scenery Castle Walls and Towers, many small buildings within. The streets should feel crowded and cramped with many turns.
The four crusaders must navigate to the gate without being seen. The defenders should be set up in four patrols of five soldiers in various areas of the setup. I recommend doing a grid and setting up the patrols at random. The soldiers should be governed by a deck of cards; each time a card is drawn, it indicates something.
Red FaceCard Movement directly forward as much as possible Red Odd Card Turn Right next chance forward Red Even Card Turn Left next chance forward
Black Facecard Movement moves directly backward as much as possible Black Odd Card Turn right next chance backward Red Even Card turn left next chance backward
Thus, the patrol moves randomly through the area. In the event of an encounter with the opposing troops, each group moves towards the combat until they come in contact with the crusaders or the fighting ends.
If a patrol spots the crusaders (6″range) a card is flipped. A red card, the defenders’ attack, a black card, they flee towards the bell.
Combat is resolved simply. Two combatants each roll a D6; the crusaders get +2. The loser is eliminated. The engagement range is adjacent to the models. The crusaders can take crossbows. Lethal hits on 5s. The crusaders should be slightly faster than the defenders.
This will be my shortest and sweetest post. There is no better way to wargame than with handcrafted terrain.
See the shortest and sweetest.
Benefits of Handcrafted
Remember what came from 3D Printing? Handcrafted is better. The care, the design, the patience. All things crucial for a wargamer. You can build anything as long as you can picture it. Thousands of YouTube videos and blog posts will help you on your way. Want to craft an airbase from Top Gun: Maverick go for it. The possibilities are endless. It is your size, vision, and hobby in the most whole way possible.
Handcrafted terrain is typically far cheaper than any other option. You can use garbage and recyclables to create stunning dioramas of perfect proportions. You can buy craft paints from Walmart, brushes from the cheapest of the cheap places, and make something of your own.
Downsides
The only downside, and unfortunately, the most consequential, is time. It takes time to build, vision board, paint, learn, and time, and more time, and more time.
The other slight downside is artistic skill. I am not an artist, but I think this can be practiced again with time.
Very little can be said about 3D Printing that others have not written about. You can buy any form of terrain 3D printed that you can imagine. Want a scale model of Helms Deep? Boom, got it. Want a Kashyyk-style tree village, done. Want industrial acid basins and floating skull rocks? You can print them.
As wargamers, we have stopped asking if we can and started asking if we should.
I am not going to discuss how to 3D print. There are thousands of YouTube videos and guides on how to use a 3D printer and what 3D printer to buy. I will focus on my experiences with 3D printing and how that helps or hinders me as a gamer.
What to 3D Print
I personally own about ten 3D printers, two or three of which are functional at any one time. I know I am hard on printers, but I also don’t have the time, energy, or discipline to properly maintain such sensitive hardware.
I have found that the happiest part of printing is small prints of minor pieces. If I want to add a burned-out car, I can find a print for that. If I want some sandbag barricades, a few fences, or tank traps, I am happy to 3D print those.
I struggle with 3D printing because I want to do large setups. That Helms Deep scenery I talked about earlier? I hired it out. I am finding that by investing my time, buying the filament, and dealing with failures, I have forgotten or lost my passion for the project. I figured I would need $765 worth of filament, and I was able to order the scenery for $1000. Large scenery is better purchased. With the low barrier to entry in the market, you will always get a fair price.
If I need a specific building for a scenario—think Pavlov’s house for Stalingrad, or I did a Geonosian table—I am happy to 3D print it. However, I refused to 3D print my competitive 40k setup; it required over 140 prints, and I just didn’t have the energy.
How to Use 3D Prints
3d Prints are usually more durable than handcrafted or MDF items. The right 3D prints can also be stunning in detail. No matter how good the model is, a poor 3D print job tends to be unsalvageable.
I also think 3d prints must be painted to look acceptable on the table. I am well-versed in using rocks and some buildings in filament grey. They really just look like brown or grey lumps on the table. Get out your airbrush, throw on a basecoat, and then get a big drybrush and go over everything. Your models will pop on the table. You don’t have to do a bunch of details like shutters or drainpipes, just a basecoat and a drybrush.
My favorite use for 3D printing is to bring something to life. For the third time, I will refer to Helms Deep, an iconic location and one of the most significant cinematic battlefields ever. My crafting skills would be woefully insufficient to create such a majestic location. 3D printing fills that role. It is tangible and durable, and I can pack it away until next time.
Downfalls of 3D Printing
3D printing is the perfect solution for wargames. You can print exactly what you want. You can change the scale. With enough practice, you can even edit the models to your liking.
The biggest problem with 3D prints is space. The voluminous number of models available means I want all of them. I like Eastern European buildings, Western European buildings, American West buildings, South American buildings, Moon Landings, Elven buildings, and Orcish Camps, and I want them on different scales.
I literally own multiple warehouses and storage facilities and I am having trouble storing the amount of shit I have acquired for gaming. My addiction to buying 3D-printed scenery is a significant part of that problem. Looking at my most recent Etsy Orders, I have 3 full 40k or AOS terrain tables en route.
Each table typically requires a large tote to store, which requires labeling and even remembering exactly what is in that tote.
One major drawback of 3D printing is the layer lines. These layer lines will show up with a simple dry brush unless properly sanded or filled. To alleviate this, I prime most models with an automotive primer that fills most lines. It also fills in many details.
Other downfalls can include a lack of connection to said scenery. In our hobby, it is essential that we are happy with our participation. We will spend 1000 hours on a single army, painstakingly painting facial features and belts and using waterslide decals to place insignia. We take them to the table and create stories regarding the models, and we remember each and every figure. Crafting buildings from foam, measuring, and painting builds that connection. A 3D print doesn’t.
Finally, the environmental impacts of 3D printing are not insignificant. If you’re into that sort of thing, think of how much plastic can be created and wasted, the large spools, the spilled resin, and the unused models that we print because we can. That kind of workload has a measurable effect on the environment.
Overall
I would recommend 3D printing to all hobbyists in any hobby. The tool is far too versatile not to use. You no longer need a $2,000 machine with tons of software and custom-built parts. Most printers are plug-and-play. To be able to download and print a Japanese bunker in the Philippines one day and a trebuchet the next is invaluable for someone who plays a variety of games.
Feel free to look back at parts 1,2,3,4. Part 5 will focus on scatter terrain and other enhancements.
Scatter terrain is simply items scattered about the battlefield that add flair but not much to gameplay.
Scatter terrain has a special place in my wargaming soul. For photo-realistic games, scatter terrain is crucial to what we do as gamers. Why would we have a ruined structure with no rubble around its base? A WWII Battlefield with no impact craters? Fences and hedges in the Civil War and European battlefields.
The other aspect of scatter terrain is how it impacts gameplay. In 40k, a Land Raider can’t end its turn on top of a piece of terrain. If we add too much scatter, the game stops working. The same works for your rank and flank games; a fence is hell when dealing with a movement tray.
Why Use Scatter Terrain
As challenging as the scattered terrain is, it looks good on the table. Broken bits of concrete with rebar sticking out, damaged furniture, burned-out cars, and an upturned cart with a dead horse are all staples in cinematography. If you want a gorgeous table, scatter terrain is a must.
Scatter is also amazing in small skirmish games. A couch in the middle of the street becomes a cover piece in Bolt Action. Marvel Crisis Protocol lives or dies on scatter terrain pieces. A new flair is added to a caved-in ceiling on a boarding action board.
I swear by adding telephone poles and street signs to any battlefield. It just adds that extra something.
Where not to Use Scatter
Any large-scale wargame designed to be more competitive struggles with a ton of scatter added. Even less competitive but still large-scale don’t work well. Flames of War, Genera D Armee, Across a Deadly Field, DBMM, The Old World, Conquest, Age of Sigmar, and 40k don’t need scatter terrain. Stick with what the rules call for.
Best Types of Scatter
You really have to think about how you want your game to feel. Scatter that doesn’t interfere, but also has to have a purpose. Hay bales and wood piles provide cover. The same with burned-out cars. Piles of bricks just get in the way and are difficult to clean up post-game. Small, fully-painted flower gardens look nice, but don’t add to gameplay. However, a concrete sidewalk next to a city street in a modern zombie game adds so much to the feel of your table and doesn’t hinder gameplay in the slightest.
Street signs can be removed if hindering, but they look nice for photos.
My ultimate pick for scatter terrain is stuff that can be easily set up and cleaned up.
I generally only set a table for two or at most three games. I have full respect for players who go all out and spend 100 hours creating a custom table for Lord of the Rings or World War Z or whatever else. Every piece of terrain and scatter is meticulously painted, and the photo ends up in some magazine.
That’s not me. I want a functional table to play on that looks nice. End of story. If you are the type of player who wants a photoshoot-quality table, this isn’t the best guide for you. If you just want to level up your table from bleh to meh. Take my advice.